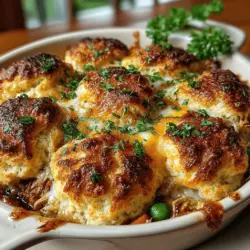
Flaky Chicken and Cheddar Biscuit Pot Pie Recipe
Pot pies have long been celebrated as a comforting staple in numerous cuisines around the world. The warm, savory aroma of a pot pie baking in the oven evokes feelings of nostalgia and homeliness, making it a favorite for family dinners and gatherings. Traditionally, pot pies feature a hearty filling encased in a golden crust, but today we’re giving this classic dish a delightful twist. Introducing the Flaky Chicken and Cheddar Biscuit Pot Pie, a recipe that boasts a rich, creamy filling topped with a light and flaky cheddar biscuit crust.
This innovative take on the beloved pot pie not only appeals to the palate but also simplifies the cooking process, making it an ideal choice for busy weeknights or special occasions. The combination of tender chicken, vibrant vegetables, and fragrant herbs enveloped in a luscious sauce creates a filling that is both satisfying and flavorful. Topped with cheddar biscuits that are light, airy, and bursting with cheesy goodness, this dish is sure to impress your family and guests alike.
In this article, we will explore the ingredients that contribute to this delicious dish, guide you through the initial steps of preparation, and set you on the path to creating your own Flaky Chicken and Cheddar Biscuit Pot Pie.
Understanding the Ingredients
To create a truly remarkable Flaky Chicken and Cheddar Biscuit Pot Pie, it’s essential to understand the role each ingredient plays in crafting the dish’s rich flavor and delightful texture.
Key Ingredients in the Filling:
1. Olive Oil: Used for sautéing, olive oil adds a layer of depth to the filling while keeping it moist.
2. Onion and Garlic: These aromatic ingredients serve as the flavor foundation, enhancing the overall taste of the dish.
3. Carrots and Celery: Commonly known as mirepoix, these vegetables not only provide sweetness and crunch but also contribute essential vitamins and nutrients.
4. Peas: Adding a pop of color and a burst of sweetness, peas balance the savory elements of the filling.
5. Chicken: Shredded or diced chicken is the star of the filling, delivering protein and heartiness to the dish.
6. Flour: This ingredient plays a crucial role in thickening the sauce, ensuring the filling has the right consistency.
7. Chicken Broth: A rich chicken broth is vital for infusing the filling with flavor and moisture.
8. Herbs: Fresh herbs like thyme or parsley elevate the dish, adding freshness and complexity to the flavors.
9. Salt and Pepper: These essential seasonings enhance the taste of all the ingredients, bringing out their natural flavors.
10. Cream: A splash of cream adds richness and a velvety texture, making the filling irresistibly creamy.
Cheddar Biscuit Topping Ingredients:
1. Flour: The base of the biscuit dough, providing structure.
2. Baking Powder and Baking Soda: These leavening agents ensure the biscuits rise, resulting in a light and fluffy texture.
3. Salt: A pinch of salt enhances the flavor of the biscuits.
4. Garlic Powder: This ingredient infuses the biscuits with savory notes, complementing the chicken filling.
5. Butter: Cold, cubed butter is essential for achieving that flaky texture; it creates layers within the dough.
6. Cheddar Cheese: Sharp cheddar adds a rich, tangy flavor that pairs perfectly with the creamy filling.
7. Buttermilk: The acidity of buttermilk helps tenderize the dough, resulting in biscuits that are both flaky and moist.
The combination of these ingredients results in a delightful contrast between the creamy filling and the flaky biscuit topping, creating a pot pie that is not only comforting but also bursting with flavor.
Preparing the Filling
Now that we’ve covered the ingredients, let’s dive into the step-by-step process of making the chicken filling for your Flaky Chicken and Cheddar Biscuit Pot Pie.
Step 1: Sauté the Vegetables
Begin by heating a tablespoon of olive oil in a large skillet over medium heat. Add the chopped onion and minced garlic to the pan, sautéing until the onion becomes translucent and fragrant, about 3-4 minutes. This step is crucial, as it builds a flavorful base for your filling. Next, toss in the diced carrots and celery, cooking them until they soften, approximately 5 minutes. Adding these vegetables at this stage ensures they cook evenly and contribute their flavors to the filling.
Step 2: Add the Peas and Chicken
Once your mirepoix is ready, stir in the peas and shredded chicken. If you’re using pre-cooked chicken, ensure it’s warmed through. This is also a great moment to incorporate any fresh herbs you might be using, such as chopped thyme or parsley; their aromatic qualities will elevate the dish.
Step 3: Create the Sauce
To thicken your filling, sprinkle the flour over the sautéed chicken and vegetables, stirring well to coat everything evenly. This will help to create a roux, which acts as a thickening agent when combined with the liquids. Gradually pour in the chicken broth, stirring continuously to avoid lumps. The mixture will begin to thicken as it heats. Once it reaches your desired consistency, stir in a splash of cream for added richness. Season with salt and pepper to taste, ensuring the flavors are well-balanced.
With your filling prepared, it’s time to turn your attention to the cheddar biscuit topping that will crown this delightful dish.
Creating the Cheddar Biscuit Topping
For the finishing touch, the cheddar biscuit topping is a simple yet rewarding addition. Start by preheating your oven to 425°F (220°C) to ensure it’s hot enough to create beautifully risen biscuits.
Step 1: Combine Dry Ingredients
In a mixing bowl, whisk together the flour, baking powder, baking soda, salt, and garlic powder. This step is vital for evenly distributing the leavening agents throughout the flour, ensuring your biscuits rise uniformly.
Step 2: Cut in the Butter
Next, add the cold, cubed butter to the dry ingredients. Using a pastry cutter or your fingertips, work the butter into the flour mixture until it resembles coarse crumbs. This technique is essential for achieving that flaky texture, as the cold butter creates steam pockets while baking.
Step 3: Add Cheese and Buttermilk
Fold in the shredded cheddar cheese, ensuring it is evenly distributed throughout the mixture. Then, gradually pour in the buttermilk, mixing gently until just combined. Be careful not to overwork the dough, as this can lead to tough biscuits. The dough should be slightly sticky but manageable.
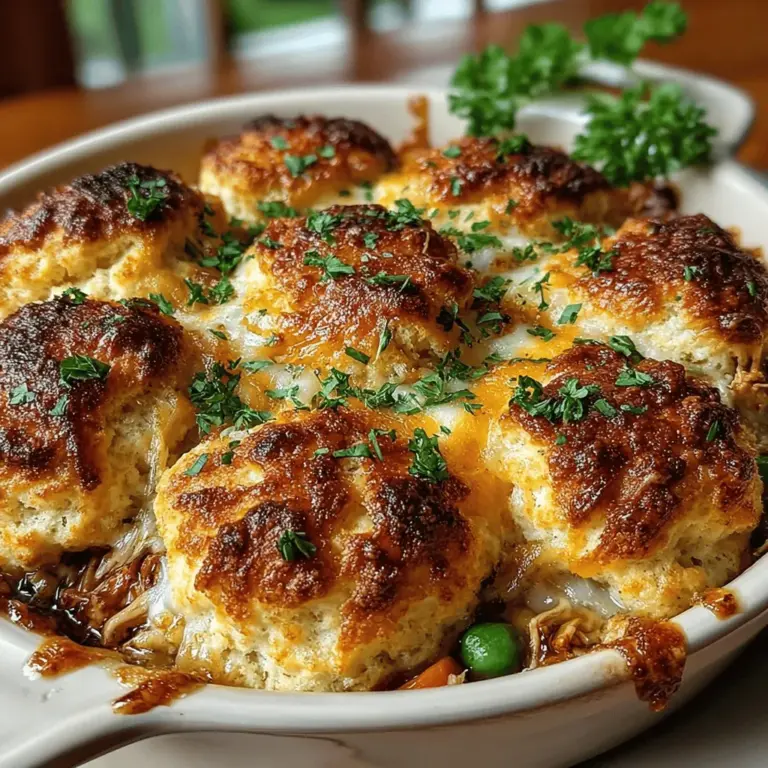
With the biscuit dough ready, you’re on your way to assembling the Flaky Chicken and Cheddar Biscuit Pot Pie. In the next section, we will guide you through the final steps of assembling and baking your mouthwatering creation, bringing together all the elements for a meal that is sure to become a family favorite.
{{image_2}}
Importance of Using Cold Butter for Flaky Biscuits
When it comes to achieving the perfect biscuit texture for your Chicken and Cheddar Biscuit Pot Pie, the temperature of your butter is crucial. Using cold butter is essential because it creates steam during baking, which leads to that delightful flaky texture everyone craves. When the cold butter melts in the oven, it leaves behind tiny pockets of air within the dough, resulting in light, airy biscuits that sit atop your savory filling.
To ensure your butter remains cold, consider cutting it into small cubes and placing it back in the refrigerator for a short while before mixing it into your dry ingredients. This practice prevents the butter from softening too much and helps maintain that ideal flaky biscuit texture.
Tips on Mixing the Dough Without Overworking
One of the most important aspects of biscuit-making is to avoid overworking the dough. Overmixing can lead to tough, chewy biscuits instead of tender, flaky ones. Here are some tips to keep in mind:
1. Use a Pastry Cutter or Fork: When incorporating the butter into the dry ingredients, use a pastry cutter or a fork to cut the butter into the flour. Aim for a texture that resembles coarse crumbs with some larger pea-sized pieces of butter remaining.
2. Combine Ingredients Quickly: After adding the wet ingredients to the dry mixture, mix just until combined. It’s okay if the dough looks a bit shaggy and uneven. This indicates that you haven’t overworked the dough.
3. Rest the Dough: After mixing, allow the dough to rest for about 10 minutes. This resting period hydrates the flour and relaxes the gluten, which contributes to a more tender biscuit.
How to Achieve the Right Biscuit Texture for the Topping
For the topping of your pot pie, you want biscuits that are fluffy and light yet sturdy enough to hold up under the savory filling. Here’s how to achieve that perfect biscuit texture:
– Use Fresh Ingredients: Always opt for fresh baking powder and flour. Stale ingredients can hinder the rising process, resulting in dense biscuits.
– Incorporate Cheese Wisely: If you’re adding cheddar cheese to your biscuit dough, grate it finely. This helps to distribute the cheese evenly throughout the dough, contributing to a better texture and flavor without weighing the biscuits down.
– Adjust Liquid as Needed: Depending on the humidity and the type of flour you’re using, you may need to adjust the amount of milk or buttermilk slightly. The dough should be moist but not overly sticky. Start with the recommended amount and add more if needed, a tablespoon at a time.
Assembling the Pot Pie
Now that your biscuits are ready, it’s time to assemble the pot pie. This step is both exciting and essential to ensure an evenly cooked and beautiful dish.
Step-by-Step Instructions for Assembling the Pie
1. Prepare the Filling: Ensure your chicken and vegetable filling is cooked through and bubbling. If you haven’t already, mix in your seasonings and let the filling cool for a few minutes before assembling.
2. Transfer Filling to Baking Dish: Pour your chicken and vegetable filling into a greased baking dish, spreading it evenly across the bottom. It’s crucial to have a uniform layer to ensure even cooking and a balanced flavor in every bite.
3. Drop the Biscuit Dough: Using a spoon or an ice cream scoop, drop spoonfuls of the biscuit dough on top of the filling. Make sure to leave some space between each biscuit for them to expand while baking.
Techniques for Evenly Distributing the Filling and Biscuit Dough
For an aesthetically pleasing pot pie, consider the following techniques:
– Use a Spatula: After pouring the filling into the dish, use a spatula to ensure the filling is leveled. This will help the biscuit topping bake evenly.
– Dollop Method: When adding the biscuit dough, use a consistent size for each dollop (about 2 tablespoons) to ensure even cooking. Varying sizes can lead to some biscuits being undercooked while others may overcook.
Tips on Presentation and Ensuring a Visually Appealing Dish
To create a dish that looks as good as it tastes, keep these presentation tips in mind:
– Brush with Butter: Before baking, brush the tops of the biscuit dough with a little melted butter. This will give your biscuits a lovely golden color and add richness.
– Sprinkle with Herbs: Consider sprinkling fresh or dried herbs such as parsley or thyme on top of the biscuit dough before baking. This not only enhances the visual appeal but also adds an aromatic touch.
Baking the Pot Pie
With your pot pie assembled, it’s time to bake it to perfection. Following the correct baking guidelines is crucial for achieving that bubbly filling and golden biscuit topping.
Guidelines for Baking Times and Temperatures
– Preheat Your Oven: Always preheat your oven to 400°F (200°C) before placing your pot pie inside. A hot oven ensures immediate cooking and helps the biscuits rise.
– Baking Time: Bake your pot pie for approximately 25-30 minutes or until the biscuit topping is golden brown and the filling is bubbling around the edges.
Importance of Monitoring the Biscuit Topping for Doneness
Keep an eye on the biscuit topping as it bakes. Depending on your oven, you may need to rotate the pot pie halfway through to achieve even browning. If the biscuits start to brown too quickly, cover the top loosely with aluminum foil to prevent burning while allowing the filling to heat through.
Tips for Ensuring the Filling is Hot and Bubbly While the Topping is Perfectly Golden
To ensure that both the filling and topping are cooked properly, consider these tips:
– Heat the Filling First: Make sure your filling is hot before adding the biscuit topping. This will help prevent a scenario where the biscuits cook before the filling is heated through.
– Test for Doneness: Insert a toothpick into the biscuit topping. If it comes out clean and the tops are golden brown, your pot pie is ready to be taken out of the oven.
Serving Suggestions
Once your Flaky Chicken and Cheddar Biscuit Pot Pie is baked to perfection, it’s time to serve and enjoy. Here are some ideas to elevate your presentation and enhance the dining experience.
Ideas for Garnishing the Pot Pie
Fresh garnishes can elevate the visual appeal of your dish. Consider:
– Chopped Fresh Parsley: Sprinkle finely chopped parsley over the top of the pot pie before serving. This adds a pop of color and freshness.
– Grated Cheese: A sprinkle of extra cheddar cheese on top just before serving can make your pot pie look even more inviting.
Suggestions for Side Dishes that Complement the Pot Pie
To complete your meal, serve your pot pie with complementary side dishes:
– Mixed Greens Salad: A light salad with mixed greens, cherry tomatoes, and a vinaigrette dressing balances the richness of the pot pie.
– Roasted Vegetables: Consider serving with a side of roasted seasonal vegetables, which add both color and flavor to your meal.
Presentation Ideas for Serving
To emphasize the rustic charm of this home-cooked meal, serve the pot pie in a cast-iron skillet or a rustic ceramic dish. These options not only keep the pot pie warm but also add character to your dining table.
Conclusion
In summary, the Flaky Chicken and Cheddar Biscuit Pot Pie is a comforting and satisfying dish that brings together the warm flavors of chicken, cheddar, and flaky biscuits. Its versatility makes it a perfect option for family gatherings, cozy weeknight dinners, or even special occasions.
This recipe encourages creativity in the kitchen and invites you to enjoy the process of cooking. As you savor each bite, take pride in having created a wholesome dish that is sure to delight your family and friends. We encourage you to try this recipe, share your experience, and perhaps even make it a family tradition. Happy cooking!