
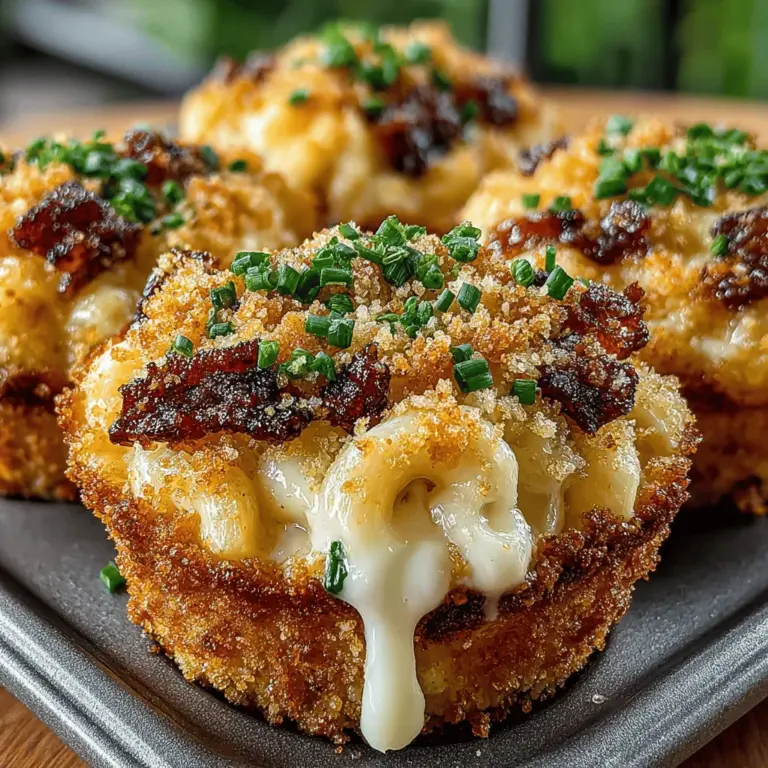
Pint-Sized Cheesy Bliss: Mini Mac and Cheese Bacon Cups
When it comes to comfort food, few dishes evoke as much nostalgia and happiness as mac and cheese. This creamy, cheesy delight has secured its place as a beloved classic, cherished by people of all ages. In recent years, the trend of bite-sized comfort food has gained momentum, transforming traditional recipes into shareable, miniature versions. One splendid example of this phenomenon is the Pint-Sized Cheesy Bliss, or Mini Mac and Cheese Bacon Cups. This innovative recipe takes the familiar flavors of mac and cheese and elevates them by incorporating crispy bacon, all while presenting them in convenient muffin-sized portions. Perfect for gatherings, parties, or family dinners, these bite-sized treats offer a delightful twist that will have your guests clamoring for more.
The Magic of Mini Mac and Cheese Cups
The allure of miniaturized versions of classic dishes cannot be overstated. From sliders to bite-sized tacos, these pint-sized offerings are not only visually appealing but also incredibly versatile. They provide a unique opportunity for creativity in the kitchen while making entertaining easier and more enjoyable. The growing trend of “pint-sized” food has taken the culinary world by storm, allowing hosts to serve a variety of flavors in manageable portions. Whether it’s a casual gathering with friends, a festive holiday party, or a more formal celebration, mini mac and cheese bacon cups can cater to a range of events and occasions.
Imagine a vibrant buffet table filled with an assortment of delicious bites, each one inviting your guests to indulge without the commitment of a full-sized portion. These mini cups serve as the perfect vehicle for transporting the rich, cheesy goodness that mac and cheese is known for, while the addition of bacon introduces a savory element that elevates the dish to new heights. Plus, the ease of serving them in muffin tins means less mess and more enjoyment for everyone involved.
Key Ingredients for Cheesy Bliss
To create the ultimate mini mac and cheese bacon cups, it’s essential to select the right ingredients that will work harmoniously to deliver the perfect blend of flavor and texture. Here’s a detailed breakdown of the key components that contribute to this delectable dish:
– Elbow Macaroni: As the base of this recipe, elbow macaroni is the ideal pasta shape for holding onto the creamy cheese sauce. Its small, curved shape allows for maximum sauce adhesion, ensuring every bite bursts with cheesy goodness.
– Sharp Cheddar Cheese: Selecting the right cheese is crucial for achieving the desired flavor profile. Sharp cheddar is preferred for its robust, tangy taste that cuts through the creaminess of the sauce, providing a satisfying depth of flavor. The sharpness also enhances the overall experience, making each bite memorable.
– Whole Milk and Cream Cheese: These ingredients come together to create a luxurious, creamy cheese sauce. Whole milk contributes to a rich, velvety texture, while cream cheese adds a delightful creaminess that elevates the dish to a whole new level. The combination ensures that each mini cup is irresistibly smooth and indulgent.
– Unsalted Butter: Essential for flavor, unsalted butter serves as the base for the cheese sauce. It not only adds richness but also helps to create a smooth, cohesive blend when combined with the other ingredients. Using unsalted butter allows for better control over the seasoning of the final dish.
– Garlic Powder and Smoked Paprika: These seasonings play a vital role in enhancing the overall taste profile of the mac and cheese cups. Garlic powder infuses a subtle depth of flavor, while smoked paprika adds a hint of warmth and smokiness, creating a delightful contrast to the creamy cheese.
– Crispy Bacon: The star of the show for many, crispy bacon introduces a savory element and satisfying crunch to the mini cups. Its salty, smoky flavor complements the richness of the cheese, making each bite a harmonious blend of textures and tastes.
– Panko Breadcrumbs: For those who appreciate a bit of crunch, panko breadcrumbs provide a delightful crispy topping. When baked, they create a golden crust that contrasts beautifully with the creamy interior, enhancing the overall eating experience.
– Fresh Chives: Finally, fresh chives are used as a garnish to add a pop of color and a hint of freshness. Their mild onion flavor elevates the dish while also adding a visually appealing touch that makes these mini mac and cheese cups even more enticing.
Step-by-Step Instructions for Perfect Mini Mac and Cheese Cups
Now that we have a solid understanding of the essential ingredients, let’s dive into the step-by-step process of preparing these delightful mini mac and cheese bacon cups. Following these instructions will ensure that your dish comes out perfectly every time, allowing you to impress your guests with your culinary skills:
1. Boil the Pasta: Begin by bringing a large pot of salted water to a boil. Add the elbow macaroni and cook according to the package instructions until al dente. Drain the pasta and set it aside, allowing it to cool slightly while you prepare the cheese sauce.
2. Prepare the Cheese Sauce: In a medium saucepan over medium heat, melt the unsalted butter. Once melted, add the whole milk and cream cheese, whisking until the mixture is smooth and well combined. Stir in the sharp cheddar cheese, garlic powder, and smoked paprika, continuing to cook until the cheese is fully melted and the sauce is creamy.
3. Combine Pasta and Sauce: Gently fold the cooked elbow macaroni into the cheese sauce, ensuring that the pasta is well-coated with the rich, creamy mixture.
4. Add the Bacon: Chop the crispy bacon into small pieces and fold it into the mac and cheese mixture. This will distribute the savory bacon flavor throughout each mini cup.
5. Prepare the Muffin Tin: Preheat your oven to 375°F (190°C). Grease a muffin tin with cooking spray or butter to prevent sticking.
6. Fill the Muffin Cups: Spoon the mac and cheese mixture into each muffin cup, filling them to the top. Press down gently to ensure that the mixture is compact.
7. Top with Panko Breadcrumbs: Sprinkle a generous amount of panko breadcrumbs over the top of each filled muffin cup. This will create a deliciously crispy topping once baked.
8. Bake: Place the muffin tin in the preheated oven and bake for approximately 20-25 minutes, or until the tops are golden brown and crispy.
9. Garnish and Serve: Once baked, remove the muffin tin from the oven and let the mini mac and cheese cups cool for a few minutes. Carefully remove them from the tin and place them on a serving platter. Garnish with freshly chopped chives for a touch of color and flavor.
With these initial steps, you are well on your way to creating your very own Pint-Sized Cheesy Bliss. The combination of creamy mac and cheese with crispy bacon in a convenient mini cup form is sure to delight anyone who tries them. Stay tuned for the next part of this article, where we will explore variations and tips for serving these delicious bites!
{{image_2}}
Preheating the Oven
Preheating the oven is a crucial step that should never be overlooked when baking, especially for dishes like Pint-Sized Cheesy Bliss. The importance of achieving the right temperature cannot be overstated. An oven set to the correct temperature ensures that your mini mac and cheese cups cook evenly, leading to a perfect golden brown crust and a delightful creamy interior. Aim for a temperature of 375°F (190°C) for optimal baking results. Allow your oven at least 15-20 minutes to reach this temperature before placing your muffin tin inside. This step is vital for creating that signature crispy texture that complements the gooey cheese filling.
Cooking the Pasta
When it comes to the pasta for your mini mac and cheese cups, achieving the perfect ‘al dente’ texture is key. Start by bringing a large pot of salted water to a rolling boil. The salting of the water is essential, as it enhances the pasta’s flavor from the inside out. Once the water is boiling, add your pasta, typically elbow macaroni or shells, and cook according to the package directions, but reduce the cooking time by about 1-2 minutes. You want the pasta to be firm to the bite, as it will continue to cook further in the oven. Drain the pasta and set it aside, allowing it to cool slightly while you prepare the cheese sauce.
Preparing the Cheese Sauce
Creating a luscious cheese sauce is the heart of your Pint-Sized Cheesy Bliss. Start by melting 4 tablespoons of unsalted butter in a saucepan over medium heat. Once melted, add 4 ounces of cream cheese, stirring until it fully integrates into the butter. This combination adds a rich creaminess to your sauce. Gradually whisk in 1 cup of milk, ensuring there are no lumps. Continue to stir until the mixture is smooth and begins to thicken, which should take about 3-5 minutes.
Next, it’s time to infuse your cheese sauce with flavor. Add 2 cups of shredded sharp cheddar cheese while stirring continuously until the cheese has melted completely. For an added depth of flavor, consider incorporating a pinch of garlic powder, onion powder, and a dash of hot sauce. This will elevate the taste profile of your mini mac and cheese cups and leave your guests wanting more.
Combining Ingredients
Now that you have your pasta and cheese sauce ready, it’s time to bring them together. In a large mixing bowl, combine the cooked pasta with the cheese sauce, ensuring that every piece of pasta is coated evenly. This step is crucial as it guarantees that each bite is packed with flavor. If you’re incorporating crispy bacon bits or any other add-ins like sautéed vegetables, now is the time to mix them in. Gently fold the ingredients, being careful not to break the pasta while ensuring a thorough mix.
Filling the Muffin Tins
Filling the muffin tins can be a fun and creative process! Use a greased standard 12-cup muffin tin for this recipe. To maximize flavor in every bite, utilize a small ice cream scoop or spoon to fill each muffin cup with the mac and cheese mixture. Press the mixture down lightly with the back of your spoon to ensure it’s compact and won’t collapse during baking. For an extra touch, sprinkle a little extra cheese or breadcrumbs on top of each cup to create a golden crust while baking. This not only enhances the flavor but also adds a delightful texture.
Baking
Now that your muffin tin is filled and ready, place it in the preheated oven. Bake for approximately 20-25 minutes or until the tops are golden brown and crispy. Keep an eye on them towards the end of the baking time; they can go from perfectly baked to overcooked quickly. A light golden color is the perfect indicator that your Pint-Sized Cheesy Bliss is ready!
Cooling and Removing
Once baked, remove the muffin tin from the oven and allow it to cool for about 5-10 minutes. This cooling period is essential for allowing the mini cups to set properly. Use a small knife or offset spatula to gently loosen the edges of each cup from the muffin tin. Carefully lift each mini mac and cheese cup out using a fork or your fingers. Be cautious during this step, as they can be delicate and may break if not handled gently.
Garnishing and Serving
For an appealing presentation, place the mini mac and cheese cups on a serving platter or individual plates. Garnish with freshly chopped parsley or chives for a pop of color and a fresh taste. These delightful bites are best served warm, but they can also be enjoyed at room temperature. Pair them with a side salad for a complete meal or serve them as an appetizer at parties.
Nutritional Information and Serving Suggestions
Nutritional Breakdown
Each serving of Pint-Sized Cheesy Bliss contains approximately:
– Calories: 250
– Total Fat: 12g
– Saturated Fat: 7g
– Carbohydrates: 30g
– Protein: 10g
These nutritional figures can vary based on specific ingredients used, so it’s advisable to calculate based on your chosen brands.
Serving Suggestions
For optimal enjoyment, consider serving these mini mac and cheese cups alongside:
– A crisp garden salad with a tangy vinaigrette.
– A bowl of homemade tomato soup for a comforting pairing.
– Sriracha or your favorite hot sauce for an extra kick.
– Fresh fruit or a light dip for a refreshing contrast to the richness of the cheese cups.
The Versatility of Mini Mac and Cheese Cups
One of the most appealing aspects of Pint-Sized Cheesy Bliss is its versatility, making it suited for different dietary preferences and occasions.
Vegetarian Variations
For a vegetarian-friendly option, simply omit the bacon. You can enhance the dish by adding sautéed vegetables such as spinach, bell peppers, or mushrooms for added nutrition and flavor. Consider incorporating sun-dried tomatoes or olives for a Mediterranean twist.
Gluten-Free Options
To cater to gluten-free diets, substitute traditional pasta with gluten-free pasta options available in stores. Additionally, choose gluten-free breadcrumbs for the topping to maintain the crunchy texture.
Flavor Variations
Feel free to experiment with different cheese combinations to customize the flavor of your mini mac and cheese cups. Mixing sharp cheddar with mozzarella creates a wonderfully gooey texture, while adding pepper jack can bring a spicy element. Other possibilities include gouda, cream cheese, or even blue cheese for those who enjoy a bolder taste. Consider adding cooked seafood, such as shrimp or crab, for a luxurious twist.
Conclusion
Pint-Sized Cheesy Bliss is not just a recipe; it’s an experience that delights both the palate and the heart. These mini mac and cheese cups are the perfect addition to any gathering, capturing the essence of comfort food while presenting it in an engaging, shareable format. The ease of preparation, combined with the delightful flavors and textures, makes this dish a must-try for home cooks of all skill levels.
Whether you’re hosting a party, preparing a family meal, or simply indulging in a cozy night at home, these mini cups are sure to impress. Embrace the fun of creating and sharing these delectable treats, and watch as they become a staple in your cooking repertoire. Dive into the world of Pint-Sized Cheesy Bliss and enjoy the smiles they bring to your table!
