Zesty No-Bake Lemon Raspberry Bliss Bars: A Refreshing Treat for All Occasions
As the temperatures rise and the days grow longer, the desire for a refreshing dessert often takes center stage. Enter the Zesty No-Bake Lemon Raspberry Bliss Bars, a delightful treat that perfectly captures the essence of summer in each bite. These bars are not just a feast for the taste buds; they are a vibrant addition to any gathering, bringing together the tangy brightness of fresh lemons and the sweet juiciness of raspberries. Whether you’re hosting a backyard barbecue, a picnic in the park, or simply looking for a sweet indulgence to enjoy on a warm afternoon, this recipe is the answer.
No-bake desserts have gained immense popularity for their simplicity and quick preparation, making them a favorite among both seasoned bakers and kitchen novices alike. With minimal fuss and no need for an oven, these bars allow you to whip up a delicious dessert without overheating your kitchen. Our Zesty No-Bake Lemon Raspberry Bliss Bars feature a crunchy graham cracker crust that provides the perfect foundation for the luscious lemon filling and vibrant raspberry topping.
A Brief Background on No-Bake Desserts
The no-bake dessert trend has its roots in home cooking, where convenience often reigns supreme. These easy-to-make sweets became particularly popular in the mid-20th century, with recipes circulating in community cookbooks and family gatherings. They are especially favored during warmer months when the last thing anyone wants to do is turn on the oven. This recipe not only embraces that tradition but elevates it with fresh, zesty flavors that are as appealing to the eye as they are to the palate.
Understanding the Ingredients
To create the perfect Zesty No-Bake Lemon Raspberry Bliss Bars, it’s essential to understand the role of each ingredient in this delightful dish.
Exploring the Crust Components
The base of these bars is made from graham cracker crumbs, which provide a crunchy texture that complements the silky lemon filling. Graham crackers, originally created as a wholesome food option in the 19th century, have become a staple in many dessert recipes. Their subtle sweetness and crumbly nature make them ideal for pie crusts and bars alike.
Melted unsalted butter is the binding agent that holds the crust together, ensuring that it maintains its shape when cut into bars. The butter not only adds richness but also enhances the overall flavor profile of the crust. The addition of sugar helps to balance the flavors, contributing a hint of sweetness that harmonizes with the tartness of the lemon filling.
Unpacking the Lemon Filling Ingredients
The star of the show in these bliss bars is undoubtedly the lemon filling. Freshly squeezed lemon juice and zest are essential for an authentic flavor that transports you to a sun-soaked citrus grove. The acidity of the lemon juice balances the sweetness of the other ingredients, while the zest adds a fragrant aroma and an extra punch of citrus flavor.
Cream cheese is the secret to achieving a creamy and smooth texture in the filling. It provides a rich base that pairs beautifully with the bright lemon flavor. Adding whipped topping lightens the mixture, creating a fluffy consistency that makes each bite feel indulgent yet refreshing. Finally, a splash of vanilla extract rounds out the flavor, enhancing the overall taste without overpowering the lemony zing.
The Raspberry Layer Essentials
To add a burst of color and flavor, fresh raspberries are used in the topping. Their vibrant hue not only makes the bars visually appealing but also adds a sweet and slightly tart contrast to the lemon filling. The natural sweetness of the raspberries, when combined with a touch of sugar and lemon juice, creates a syrupy layer that complements the citrus notes beautifully.
Step-by-Step Preparation Guide
Now that we’ve explored the delightful ingredients that make up our Zesty No-Bake Lemon Raspberry Bliss Bars, it’s time to dive into the preparation process. Follow these step-by-step instructions to create a dessert that is sure to impress.
Crafting the Perfect Crust
1. Gather Your Ingredients: Start by assembling graham cracker crumbs, melted unsalted butter, and sugar.
2. Mix the Crust: In a mixing bowl, combine 1 ½ cups of graham cracker crumbs with ½ cup of melted butter and ¼ cup of sugar. Stir until the mixture resembles wet sand.
3. Press the Mixture: Transfer the crust mixture to a 9×9-inch baking pan. Using the back of a measuring cup or your fingers, firmly press the mixture into an even layer at the bottom of the pan.
4. Chill for Firmness: Place the crust in the refrigerator for at least 30 minutes to allow it to set. This step is crucial for ensuring that your bars hold their shape when sliced.
Creating the Luscious Lemon Filling
1. Prepare the Filling Ingredients: In a mixing bowl, combine 8 ounces of softened cream cheese, 1 cup of powdered sugar, ½ cup of fresh lemon juice, and the zest of one lemon.
2. Mix Until Smooth: Using an electric mixer, beat the cream cheese and sugar mixture until it’s smooth and creamy, ensuring there are no lumps.
3. Fold in the Whipped Topping: Gently fold in 1 ½ cups of whipped topping until fully incorporated. Be careful to maintain the airy texture of the whipped topping for a light filling.
4. Spread the Filling: Once your filling is ready, pour it over the chilled graham cracker crust, smoothing it out with a spatula to create an even layer.
As we embark on this culinary journey, the anticipation builds for the refreshing bite of our Zesty No-Bake Lemon Raspberry Bliss Bars. With the crust firmly in place and the luscious lemon filling spread evenly, the next steps will involve creating the vibrant raspberry layer that will crown this dessert. Stay tuned for the continuation of this mouthwatering recipe, where we will explore the final touches that make these bars a true blissful treat!
{{image_2}}
Instructions for Pouring and Spreading the Lemon Filling
Once you have prepared your crust and it has cooled completely, it’s time to pour and spread the refreshing lemon filling. Start by gently pouring the lemon filling over the crust. To achieve an even layer, you can use a rubber spatula to spread the filling from the center outwards, ensuring that it fills every corner of the crust. Be careful not to disturb the crust as you spread the filling. A smooth, flat surface will not only enhance the appearance of your bars but will also ensure an even taste in every bite.
Tips on How to Refrigerate Properly to Ensure a Firm Set
Refrigeration is crucial for achieving the perfect texture in your lemon raspberry bliss bars. After you have spread the lemon filling, cover the dish with plastic wrap or aluminum foil to prevent any unwanted odors from your fridge from seeping in. Allow the bars to chill in the refrigerator for at least 2 hours. For best results, refrigerate them overnight. This extended chilling time allows the filling to set firmly, ensuring that your bars hold their shape when sliced. If you’re in a hurry, check the firmness after 2 hours; the filling should feel solid, not jiggly.
Cooking the Raspberry Layer to Perfection
Guide on Gently Cooking the Raspberry Mixture to Prevent Burning
While the lemon layer sets, you can prepare the raspberry layer. Start by placing your fresh or frozen raspberries in a medium saucepan over low to medium heat. Stir gently as the raspberries begin to break down and release their juices. It’s essential to keep an eye on the mixture to prevent burning; if you notice any signs of sticking or browning, reduce the heat immediately. Add a tablespoon of sugar to balance the tartness of the raspberries and stir until dissolved. Allow the mixture to simmer for about 5-7 minutes, until it thickens slightly but still retains some of its texture.
Importance of Cooling to Maintain the Integrity of the Layers
Once your raspberry mixture has thickened, remove it from the heat and let it cool for about 10 minutes. This cooling period is crucial as it ensures that when you pour the raspberry mixture over the lemon layer, it won’t disturb the delicate filling beneath. If the raspberry layer is too hot, it can melt the lemon filling, resulting in a muddled appearance and texture. Patience is key here; allowing both layers to cool properly will lead to a stunning final product.
Layering the Raspberry Delight
Instructions on Pouring the Raspberry Mixture Without Disturbing the Lemon Layer
After the raspberry mixture has cooled, it’s time to layer it over the lemon filling. Gently pour the raspberry sauce in the center of the lemon layer. Using a rubber spatula or a spoon, carefully spread the raspberry mixture outward, allowing it to cover the entire surface without pushing too hard. This technique will help preserve the distinct layers that make your bars visually appealing and delicious.
Suggestions for Even Distribution for Aesthetic Appeal
For an aesthetically pleasing look, aim for an even distribution of the raspberry layer. You can use the back of a spoon to create swirls or patterns if you prefer a marbled effect. This not only adds visual interest but also enhances the overall flavor experience as the raspberry and lemon mingles together. Take your time with this step; it’s all about achieving that perfect look for your dessert.
Final Chilling for Ideal Texture
Importance of Chilling After Assembly
Once both layers are assembled, it’s essential to return the bars to the refrigerator for another round of chilling. Allow them to chill for at least an additional 2-3 hours, or until fully set. This final chilling step is crucial for ensuring that the layers adhere properly to each other and that you get clean cuts when slicing the bars. The longer you chill, the firmer your bars will be, making it easier to serve.
Tips on Knowing When the Bars Are Ready to Serve
To check if your bars are ready, gently wiggle the pan. If the filling does not jiggle, they’re set! You can also insert a toothpick into the center; if it comes out clean, your bars are ready for slicing and serving. If they still feel soft, give them more time in the fridge.
Presentation and Serving Suggestions
Slicing the Bars for Ideal Portions
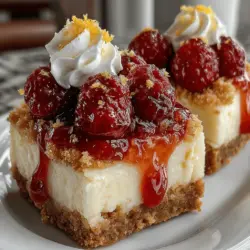
Once your bars are perfectly set, it’s time to slice them into ideal portions. To achieve clean cuts, run a sharp knife under hot water before slicing. Wipe the knife dry before each cut to prevent sticking and ensure the layers remain intact. Aim for 16 squares for generous portions or 24 if you prefer bite-sized pieces. The neat cuts will allow each serving to showcase the beautiful layers of lemon and raspberry.
Suggestions on Garnishing with Fresh Raspberries and Lemon Zest
Elevate your presentation by garnishing each bar with fresh raspberries and a sprinkle of lemon zest. This not only adds a pop of color but also gives an extra burst of flavor that complements the dessert beautifully. You can also add a dollop of whipped cream or a drizzle of lemon glaze on top for a more decadent touch.
Creating a Beautiful Dessert Platter
Consider serving your Zesty No-Bake Lemon Raspberry Bliss Bars on a beautiful platter alongside complementary desserts. Mini cheesecakes, fruit tarts, or even a light sponge cake can create an appealing dessert spread. This variety invites guests to indulge and enjoy different flavors and textures.
Tips on Pairing with Beverages for an Elevated Experience
Pair your bliss bars with refreshing beverages to enhance the overall experience. A chilled glass of sparkling lemonade or iced tea complements the flavors of the bars perfectly. For an adult gathering, consider serving them with a light white wine or a fruity rosé that brings out the tartness of the lemon and raspberry.
Nutritional Information and Dietary Considerations
Analyzing the Nutritional Components
Each serving of Zesty No-Bake Lemon Raspberry Bliss Bars contains approximately 150 calories, with 10 grams of sugar and 5 grams of fat. The bars are rich in vitamins C and A, thanks to the fresh lemon juice and raspberries, making them a delightful treat that also offers some nutritional benefits.
Discuss Potential Modifications for Dietary Restrictions
For those with dietary restrictions, modifications can easily be made. Substitute gluten-free graham crackers for the crust to make these bars gluten-free. You can also use natural sweeteners like honey or maple syrup in place of sugar to reduce refined sugars. Additionally, using almond or coconut milk can make the bars dairy-free while still achieving a creamy filling.
Conclusion
Zesty No-Bake Lemon Raspberry Bliss Bars are the perfect embodiment of summer flavors, bringing together the tartness of lemon and the sweetness of raspberries in a delightful dessert. This recipe not only showcases the vibrant colors and flavors of its ingredients but also provides an effortless way to impress family and friends. The step-by-step guide ensures that anyone can create this show-stopping treat in their own kitchen, making it a must-try for dessert lovers everywhere. Embrace the joy of no-bake desserts and savor the bliss of these refreshing bars, perfect for any occasion. Whether you’re hosting a summer gathering, celebrating a special event, or simply indulging in a sweet treat, these bliss bars are sure to delight!