Fruity Summer Bliss Popsicle Recipe
As the sun blazes overhead and temperatures soar, few things can compare to the sheer joy of enjoying a homemade popsicle. These delightful frozen treats are a staple of summer, providing a refreshing escape from the heat while allowing for endless creativity in flavors and combinations. With the rise of health-conscious eating, homemade popsicles have gained popularity not just for their tasty appeal but also for their potential health benefits. When crafted with fresh fruits and wholesome ingredients, popsicles can be a guilt-free indulgence that satisfies sweet cravings without compromising on nutrition.
Introducing the Fruity Summer Bliss Popsicle—a vibrant and refreshing treat that’s perfect for hot days. This popsicle is not only a feast for the eyes but also a celebration of the season’s best fruits, combining strawberries and kiwis for a burst of flavor. In addition to being delicious, this recipe showcases the natural goodness of fresh ingredients, making it an ideal choice for families looking to cool off with something nutritious.
Understanding the Ingredients
To create the perfect Fruity Summer Bliss Popsicle, it’s essential to understand the core ingredients that contribute to its flavor and health benefits. The primary stars of this recipe are fresh strawberries and kiwis, both of which bring distinctive tastes and numerous nutritional advantages to the table.
Fresh Strawberries
Strawberries are not only visually appealing with their bright red color, but they also pack a powerful nutritional punch. Rich in vitamin C, they support a healthy immune system and promote skin health. Additionally, strawberries are loaded with antioxidants, which can help combat oxidative stress in the body. This makes them an excellent choice for a refreshing popsicle that not only satisfies your sweet tooth but also contributes to your overall wellness.
Fresh Kiwis
Kiwis, with their unique tart flavor and vibrant green color, are another fantastic addition. These small fruits are surprisingly nutrient-dense, providing an excellent source of vitamin K, which is important for bone health and blood clotting. Kiwis are also high in dietary fiber, which aids digestion and can help maintain a healthy gut. The combination of strawberries and kiwis in this popsicle not only creates a visually stunning treat but also ensures a healthy dose of vitamins and minerals.
Choosing the Right Yogurt
The recipe offers a choice between coconut yogurt and Greek yogurt, both of which have unique benefits that cater to different dietary preferences. Coconut yogurt is a fantastic option for those seeking a dairy-free alternative. It provides a creamy texture and a subtle sweetness, making it a delightful base for the popsicles. Moreover, coconut yogurt often contains probiotics, which can be beneficial for gut health.
On the other hand, Greek yogurt is renowned for its higher protein content, making it a great choice for those looking to add a bit more sustenance to their dessert. Greek yogurt has a tangy flavor that complements the sweetness of the fruits beautifully, creating a well-rounded taste.
Hydration: Coconut Water vs. Fruit Juices
When it comes to adding liquid to the popsicle mixture, you can choose between coconut water and fruit juices. Coconut water is an excellent way to boost hydration, especially on hot summer days. It’s low in calories and rich in electrolytes, making it a great option for replenishing lost fluids after outdoor activities. Alternatively, using fresh fruit juices can enhance the flavor profile of the popsicles. However, be mindful of the sugar content in commercially processed juices; opting for freshly squeezed juice will provide a healthier option.
Natural Sweeteners
To sweeten the popsicle mixture, the recipe incorporates natural sweeteners such as honey or maple syrup. These options not only add sweetness but also come with their own health benefits. Honey, known for its antimicrobial properties, can soothe sore throats and offers a natural energy boost. Maple syrup, on the other hand, contains antioxidants and minerals like zinc and manganese, making it a wholesome alternative to refined sugars.
Enhancing Flavor with Lime Juice and Vanilla Extract
A splash of lime juice elevates the Fruity Summer Bliss Popsicle by adding a zesty kick that balances the sweetness of the fruits. Lime juice also provides vitamin C, further enhancing the nutritional value of this delightful treat. Meanwhile, a drop of vanilla extract introduces a warm, aromatic note that complements the fruity flavors beautifully, creating a harmonious blend that delights the senses.
Presentation with Fresh Mint Leaves
For those looking to add a touch of elegance to their popsicles, garnishing with fresh mint leaves is a simple yet effective way to enhance presentation. Mint not only adds a pop of color but also imparts a refreshing aroma that perfectly complements the fruity flavors.
Step-by-Step Instructions
The joy of making Fruity Summer Bliss Popsicles lies in the simplicity of the process. Follow these easy steps to prepare your refreshing treat:
Preparing the Base
Start by thoroughly washing and slicing the fresh strawberries and kiwis. Place them in a blender along with your choice of yogurt, coconut water or fruit juice, natural sweetener, lime juice, and vanilla extract. Blend the mixture until smooth, ensuring that all the ingredients are well combined.
One crucial aspect to remember during this step is to taste the mixture and adjust the sweetness according to your preference. If you find it needs a bit more sweetness, feel free to add a touch more honey or maple syrup until it reaches your desired flavor profile. This flexibility allows you to tailor the popsicle to your liking, making it a truly personalized treat.
Layering the Pops
Once you have your base ready, it’s time to get creative with layering. You can pour the blended mixture into popsicle molds, filling them about halfway. For an added burst of flavor and visual appeal, consider adding a layer of diced strawberries and kiwis before topping off with more of the blended mixture. This layering not only enhances the aesthetics but also ensures that each bite is a delightful combination of flavors and textures.
After filling the molds, insert popsicle sticks and place them in the freezer. Allow them to freeze for at least 4-6 hours, or until completely solid. This freezing time is essential for achieving the perfect popsicle consistency.
As you await the final result, the anticipation builds, and you can look forward to enjoying a refreshing, healthy treat that embodies the essence of summer.
Stay tuned for the next part of the article, where we’ll explore additional tips for perfecting your popsicles and how to easily remove them from the molds for an effortless serving experience.
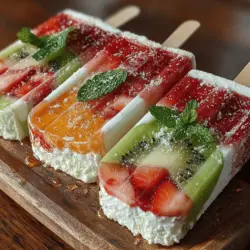
{{image_2}}
Tips for Achieving an Attractive Layered Look with Fruit Slices
Creating visually appealing popsicles is not only about the flavor but also the presentation. Layering different fruit slices can elevate the aesthetic of your Fruity Summer Bliss Popsicles, making them irresistible.
Layering Techniques
1. Choose Colorful Fruits: Use a combination of strawberries, kiwis, blueberries, and mangoes. The vibrant colors not only look beautiful but also attract the eye.
2. Cut Uniformly: Slice fruits into even pieces to ensure they layer properly. This uniformity adds to the overall visual appeal and helps in maintaining a clean look.
3. Layering Order: Start with a thicker base layer of blended fruit puree at the bottom, then add sliced fruits in a decorative manner. Continue alternating layers of puree and fruit slices until you reach the top.
4. Use Clear Molds: Opt for clear popsicle molds to showcase the beautiful layers. This way, your popsicles will look just as good as they taste when served.
Visual Appeal and Textural Contrast
The layered look not only enhances the popsicle’s visual appeal but also provides a delightful textural contrast when enjoyed. As you bite into a popsicle filled with smooth puree and crunchy fruit slices, the combination creates a unique experience that tantalizes the taste buds. The interplay between the soft, creamy layers and the juicy, fresh fruit adds depth, making each bite refreshing and enjoyable.
Inserting Popsicle Sticks
An essential step in creating your Fruity Summer Bliss Popsicles is ensuring that the popsicle sticks are inserted securely, allowing for easy removal later.
Best Practices for Secure and Straight Sticks
1. Timing is Key: Insert the popsicle sticks after the first layer of fruit puree has partially frozen. This usually takes about 30 to 45 minutes. The puree should be firm enough to hold the stick upright but still soft enough for easy insertion.
2. Placement: Center the stick in the middle of the popsicle, pushing it down into the mixture about halfway. This helps to ensure even freezing and makes the popsicle easier to handle.
3. Stabilize: If your molds have a cover, use it to help keep the sticks straight while freezing. If not, ensure the molds are placed flat in the freezer to prevent the sticks from tilting.
Freezing Process
The freezing process is crucial for achieving the perfect texture and consistency in your Fruity Summer Bliss Popsicles.
Optimal Freezing Time and Conditions
1. Freezing Duration: Allow the popsicles to freeze for at least 4 to 6 hours. For the best results, overnight freezing is ideal. This ensures that the popsicles are completely solid and will hold their shape when unmolded.
2. Temperature Settings: Set your freezer to a consistent temperature of 0°F (-18°C) or lower. Fluctuating temperatures may lead to uneven freezing and undesirable textures.
3. Spacing: Make sure the molds are spaced out in the freezer. This allows for proper air circulation, ensuring quick and even freezing.
Unmolding and Serving
Once your Fruity Summer Bliss Popsicles are ready, it’s time for the fun part—unmolding and serving!
Techniques for Safely Releasing Popsicles
1. Warm Water Method: To release the popsicles easily, dip the molds in warm water for about 10 to 20 seconds. This slight heat will help loosen the popsicle from the sides of the mold without melting it.
2. Twisting Motion: Gently twist the popsicle stick while pulling it out. This technique helps to break the seal between the popsicle and the mold, allowing for a smooth release.
3. Avoid Force: If a popsicle doesn’t come out easily, do not force it. Instead, return it to the freezer for a few more minutes and try again.
Presentation Ideas for Serving
Presentation can enhance the enjoyment of your popsicles. Here are some ideas:
1. Serve on a Platter: Arrange the popsicles on a colorful platter, garnished with fresh mint leaves or slices of the fruits used in the popsicles.
2. Dip in Chocolate: For an extra treat, dip the popsicle tips in melted chocolate and then sprinkle with nuts or coconut flakes before the chocolate sets.
3. Garnish with Fruit: Serve with a side of fresh fruit or a drizzle of fruit sauce to complement the flavors. This not only looks appealing but also adds another layer of taste.
Health Benefits of Fruity Summer Bliss Popsicles
Homemade popsicles are a healthier alternative to store-bought options, offering numerous advantages.
Advantages of Homemade Popsicles
1. Control Over Ingredients: When you make your popsicles at home, you control what goes into them. This means no artificial flavors, colors, or preservatives—just pure, wholesome ingredients.
2. Customization: You can adjust the sweetness and flavors to your preference, making them suitable for all dietary needs and preferences.
Nutritional Value of Ingredients
Each ingredient in your Fruity Summer Bliss Popsicles contributes to a healthy diet:
– Fruits: Packed with vitamins, minerals, and antioxidants, fruits like strawberries and blueberries support immune function and overall health.
– Yogurt: Adds creaminess and provides probiotics, which promote gut health. Choosing low-fat or Greek yogurt can enhance protein content as well.
– Honey or Maple Syrup: These natural sweeteners can offer additional vitamins and minerals compared to refined sugars.
Benefits of Incorporating Fruits into Summer Treats
Fruits are not just delicious; they also serve as excellent hydration sources during hot summer months. Their high water content helps keep you hydrated, while the vitamins and minerals support your body’s needs. This makes your Fruity Summer Bliss Popsicles not only a tasty treat but also a smart choice for summer enjoyment.
Creative Variations and Additions
One of the best parts about making your own popsicles is the ability to experiment with flavors and ingredients.
Alternative Fruits
Consider using seasonal fruits to switch up the flavor profile:
– Peaches: Sweet and juicy, peaches can add a delightful summer flavor.
– Raspberries: Tart and vibrant, raspberries can provide a nice contrast to sweeter fruits.
– Pineapple: For a tropical twist, add pineapple for a refreshing zing.
Yogurt Options
Experiment with different yogurt flavors to enhance the taste:
– Coconut Yogurt: Adds a tropical flavor and is perfect for vegan versions.
– Flavored Greek Yogurt: Consider using berry or vanilla-flavored Greek yogurt for added sweetness.
Superfoods and Protein Powders
For an extra health boost, consider adding:
– Chia Seeds: Packed with omega-3 fatty acids, they can add texture and nutrition.
– Protein Powder: A scoop of your favorite protein powder can enhance the popsicles’ protein content without altering the taste.
Vegan and Allergy-Friendly Variations
To make your popsicles accessible for everyone:
– Plant-Based Yogurt: Use almond or soy yogurt for a dairy-free version.
– Nut-Free Options: Ensure that any added ingredients are free from common allergens for those with sensitivities.
Conclusion
The Fruity Summer Bliss Popsicle is a refreshing and delightful treat perfect for hot summer days. Easy to prepare and customizable, these popsicles allow you to bring a taste of summer into your home. With their vibrant layers and delicious flavors, they are sure to be a hit with family and friends.
We encourage you to experiment with different fruit combinations and flavors to create your unique versions. Enjoy the process of making these popsicles, and savor the joy of sharing them with loved ones. Embrace the summer spirit and indulge in the wholesome goodness of your homemade popsicles!