Creamy Dreamy Banana Pudding Recipe
Banana pudding is not just a dessert; it’s a nostalgic treat that embodies comfort and sweetness in every spoonful. This beloved dessert has graced tables at family gatherings, picnics, and celebrations for generations, captivating taste buds with its creamy texture and delightful banana flavor. The allure of banana pudding lies in its perfect balance of flavors and textures—the smoothness of the pudding, the softness of fresh bananas, and the crunch of vanilla wafers combine to create a heavenly experience that is hard to resist.
To achieve the best flavor and texture in your banana pudding, the quality of your ingredients is paramount. Using fresh, ripe bananas is essential, as they provide the natural sweetness and flavor that make this dessert truly special. The homemade version of creamy dreamy banana pudding is not only simple to prepare but also indulgent, elevating this classic treat to new heights. In this article, we will guide you through the process of creating your very own creamy dreamy banana pudding, emphasizing the importance of each ingredient and providing detailed step-by-step instructions to ensure your success.
Understanding the Ingredients
Before diving into the preparation, it’s crucial to understand the key ingredients that will come together to create this luscious pudding. Each component plays a significant role in achieving the perfect balance of flavor and texture.
Fresh Bananas
The star of the show, fresh bananas, are what give this pudding its iconic flavor. When selecting bananas, look for those that are ripe but not overly soft. A perfect banana for pudding should have a few brown spots, indicating peak sweetness while still maintaining its shape during the cooking process. The ripeness of the bananas contributes to the overall flavor profile, enhancing the dessert’s natural sweetness without the need for excess sugar.
Granulated Sugar
Sugar is essential not only for sweetness but also for the overall texture of the pudding. It helps balance the flavors and supports the cooking process, allowing the pudding to thicken properly. The right amount of granulated sugar will elevate the dessert without overwhelming the natural banana flavor, ensuring a harmonious blend that pleases the palate.
All-Purpose Flour
All-purpose flour serves as a thickening agent, giving the pudding its desired creamy consistency. When cooked, the flour will help bind the mixture together, creating a custard-like base that holds up well against the layers of bananas and vanilla wafers. It’s important to measure the flour accurately to avoid a pudding that is too thick or too runny.
Whole Milk
For a truly creamy and rich pudding, whole milk is the best choice. It provides a velvety texture and contributes to the overall indulgence of the dessert. The fat content in whole milk is crucial for creating a satisfying mouthfeel, making each spoonful a delightful experience.
Egg Yolks
Egg yolks are a key ingredient in creating the custard-like consistency of the pudding. They add richness and depth of flavor, while also acting as a natural thickener. The proteins in the yolks will help set the pudding as it cooks, ensuring that it has the perfect texture.
Vanilla Extract
Vanilla extract enhances the flavor of the banana pudding, adding a warm and aromatic note that complements the sweetness of the bananas. Opt for pure vanilla extract for the best results; its natural flavor is far superior to imitation vanilla, making a noticeable difference in the final dessert.
Unsalted Butter
Incorporating unsalted butter into the mixture adds richness and a silky finish to the pudding. The butter also helps to create a smooth texture, making each bite melt in your mouth. Using unsalted butter allows you to control the overall saltiness of the dessert, ensuring that the flavors remain balanced.
Vanilla Wafers
Vanilla wafers are the classic texture contrast in banana pudding. They provide a delightful crunch that complements the creaminess of the pudding and the softness of the bananas. As the pudding sits, the wafers absorb some of the moisture, softening slightly while still retaining a bit of their crunch, creating a delightful layered experience.
Whipped Cream
To finish off this indulgent dessert, a generous dollop of whipped cream adds a light and airy touch. It not only enhances the presentation but also contributes to the overall creaminess of the pudding. You can make your own whipped cream or use store-bought, but homemade offers a fresher taste and can be sweetened to your liking.
Step-by-Step Instructions
Now that we have a solid understanding of the ingredients, let’s walk through the initial steps of preparing the creamy dreamy banana pudding. This recipe will guide you through the process, ensuring that you achieve a flawless result.
Preparing the Pudding Base
Begin by gathering all your ingredients and equipment. You will need a medium saucepan, a whisk, measuring cups and spoons, and a heat-resistant bowl. Start by combining the granulated sugar and all-purpose flour in the saucepan, whisking them together until well blended. This step is crucial, as it ensures that the flour is evenly distributed and helps prevent lumps from forming in the pudding.
Next, gradually whisk in the whole milk, ensuring that the mixture is smooth and lump-free. Once combined, place the saucepan over medium heat and bring the mixture to a gentle simmer. It’s important to stir constantly as it heats to prevent the mixture from sticking to the bottom of the pan or developing lumps. Use a whisk to keep the mixture moving, ensuring that the heat is evenly distributed.
As the mixture begins to thicken, you will notice a subtle change in texture. Continue stirring until the pudding reaches a thick, custard-like consistency, which should take about 5 to 7 minutes. Keep an eye on the temperature; too high a heat can cause the mixture to scorch or cook too quickly.
Incorporating the Egg Yolks
Once the pudding base has thickened, it’s time to incorporate the egg yolks. To prevent the yolks from scrambling when they are added to the hot mixture, you will need to temper them. In a separate bowl, whisk the egg yolks until they are fully blended. Then, take a small amount of the hot pudding mixture and gradually whisk it into the egg yolks. This step raises the temperature of the yolks without cooking them.
After tempering, slowly pour the egg yolk mixture back into the saucepan with the remaining pudding base, whisking continuously. This technique ensures that the eggs are evenly incorporated and helps maintain a smooth texture. Continue to cook the mixture over medium heat for an additional minute or two, allowing the flavors to meld and the pudding to reach its final consistency.
With these initial steps complete, you will have a rich and creamy pudding base ready for the addition of bananas and the finishing touches. The stage is set for creating a dessert that is not only indulgent but also a delightful homage to a classic favorite. Stay tuned for the next part of this article, where we will layer the pudding with fresh bananas and vanilla wafers, bringing this creamy dreamy banana pudding to life.
{{image_2}}
Achieving the Right Thickness for the Custard
One of the crucial steps in making creamy dreamy banana pudding is achieving the right thickness for the custard. A perfectly thick custard not only enhances the texture of your pudding but also ensures that it holds its shape when layered. To achieve this, it’s essential to cook the custard mixture until it reaches a proper temperature—around 170°F. This temperature allows the cornstarch to activate, thickening the mixture beautifully.
Keep stirring continuously while cooking to prevent the custard from sticking to the bottom of the pan or developing lumps. If you notice the mixture starting to bubble, reduce the heat to maintain a gentle simmer. Remember, patience is key—taking your time will yield a silky, smooth custard that will elevate your banana pudding to the next level.
Flavoring the Pudding
The Significance of Vanilla Extract and Butter
Once your custard has thickened, it’s time to infuse it with flavor. The addition of vanilla extract is vital; it imparts warmth and depth, complementing the natural sweetness of the bananas. Adding vanilla extract after cooking ensures that its delicate flavor remains intact. If added too early, heat can diminish its aromatic qualities.
Incorporating a tablespoon of unsalted butter at this point not only enhances the richness of the pudding but also contributes to a velvety mouthfeel. The butter should be stirred in until fully melted and combined. This step is what transforms your custard from basic to luxurious, creating a dreamy texture that will keep everyone coming back for more.
Cooling Time and Its Effect on Texture
After flavoring the pudding, allow it to cool slightly before layering. The cooling process is essential, as it will help the custard thicken further and develop its flavors. If you attempt to layer your pudding while it’s still hot, the ingredients may not adhere properly, resulting in a less cohesive dessert. Allow the custard to cool at room temperature for about 15-20 minutes before assembling your banana pudding.
Layering the Ingredients
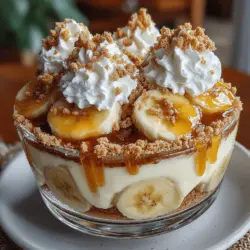
Creating Perfect Layers
The layering of your banana pudding is where the magic happens. Start by placing a layer of vanilla wafers at the bottom of your serving dish. This creates a sturdy base that will absorb some of the custard while still retaining a slight crunch. Follow this with a generous layer of banana slices, then spoon in your rich custard. Repeat the process, layering wafers, bananas, and custard until you reach the top of your dish.
For optimal presentation, try to ensure that the last layer is custard. This not only looks appealing but also prevents the bananas from browning too quickly. If you’re feeling creative, you can even alternate the layers of wafers and bananas to create a more visually interesting pattern.
Recommendations for Serving Dishes
When it comes to serving your banana pudding, the choice of dish can make a difference. A 2-quart dish is ideal for family-style serving, allowing everyone to dig in. However, for a more elegant presentation, consider using individual cups or parfait glasses. This not only makes for a stunning display but also allows for easier portion control—perfect for gatherings or special occasions.
Chilling for Best Results
Importance of Proper Chilling
After layering, it’s time to chill your banana pudding. This step is crucial as it allows the flavors to meld beautifully and the custard to set. Ideally, refrigerate your pudding for at least 4 hours, although overnight is even better. The longer it sits, the more the flavors will develop, creating a dessert that is irresistibly delicious.
Covering with Plastic Wrap
To prevent a skin from forming on your custard while it chills, cover the surface with plastic wrap. Press the wrap directly onto the custard to eliminate any air pockets. This simple step will ensure that your pudding maintains its smooth, creamy texture all the way through.
Serving Suggestions
Garnishing Your Banana Pudding
When it’s time to serve, don’t forget the finishing touches! Garnishing your banana pudding with whipped cream adds an extra layer of decadence. You can also add fresh banana slices on top for a pop of color and flavor. For a bit of crunch, sprinkle crushed vanilla wafers over the whipped cream. This not only enhances the visual appeal but also provides a delightful texture contrast.
Presentation Tips
For an appealing dessert, consider layering the pudding in clear dishes to showcase the beautiful colors and textures. When serving in individual cups, you can add a dollop of whipped cream and a few banana slices on top to create an inviting presentation. Don’t shy away from getting creative with your garnishes—mint leaves or a drizzle of caramel sauce can also elevate your banana pudding to gourmet status.
The Perfect Pairing: Complementary Dishes
Banana pudding is a versatile dessert that can be paired with various dishes to enhance your dining experience. For a delightful contrast, consider serving it alongside a slice of rich chocolate cake or a light fruit tart. These complementary flavors will create a well-rounded dessert table that your guests will love.
Drinks That Enhance the Dessert Experience
To elevate the experience further, pair your banana pudding with beverages that complement its sweetness. A cup of freshly brewed coffee can provide a nice balance, especially if you enjoy the mix of sweet and bitter. Alternatively, a dessert wine, like a sweet Riesling or a Moscato, can enhance the flavors of the pudding, making for a decadent finish to your meal.
Nutritional Information
To keep track of your indulgences, here’s a breakdown of the nutritional values per serving of creamy dreamy banana pudding:
– Calories: Approximately 300
– Total Fat: 10g
– Saturated Fat: 5g
– Cholesterol: 45mg
– Sodium: 150mg
– Total Carbohydrates: 45g
– Dietary Fiber: 1g
– Sugars: 25g
– Protein: 4g
If you’re looking to lighten this recipe, consider using low-fat milk or almond milk instead of whole milk, and reduce the amount of sugar. You can also swap out the vanilla wafers for whole-grain options or omit them altogether for a lighter dessert that still satisfies your sweet tooth.
Conclusion
Creamy dreamy banana pudding stands the test of time as a beloved dessert that brings joy to any gathering. The process of making it from scratch may seem daunting at first, but the rewards are well worth the effort. Each layer of custard, bananas, and vanilla wafers creates a symphony of flavors that will have your family and friends raving.
As you enjoy the process of crafting this delightful treat, remember that homemade desserts are not just about the end product; they are about the memories created along the way. So gather your loved ones, roll up your sleeves, and indulge in the joy of making and sharing creamy dreamy banana pudding. Your kitchen will be filled with love, laughter, and the wonderful aroma of this timeless dessert.