Decadent No-Bake Oreo Cheesecake Cups: A Sweet Sensation
In recent years, no-bake desserts have surged in popularity, captivating home bakers and dessert enthusiasts alike. These treats offer a delightful way to indulge your sweet tooth without the need for an oven or extensive baking skills. One standout recipe that has gained a dedicated following is the Decadent No-Bake Oreo Cheesecake Cups. This dessert is not only visually appealing, but it also serves as the perfect treat for any occasion, whether it’s a casual gathering, a special celebration, or simply a well-deserved indulgence after a long week.
The appeal of these Oreo cheesecake cups lies in their effortless preparation, rich flavor, and satisfying texture. Imagine a smooth and creamy cheesecake filling layered over a crunchy Oreo crust, all served in individual cups for an elegant presentation. Not only do these cups look fantastic, but they also allow for easy portion control, making them an ideal dessert for parties or family gatherings.
Understanding No-Bake Cheesecakes
Before diving into the specifics of our Decadent No-Bake Oreo Cheesecake Cups, it’s essential to understand what makes no-bake cheesecakes unique. Unlike traditional cheesecakes that require baking in a water bath and significant oven time, no-bake cheesecakes are designed to set in the refrigerator. This method eliminates the need for heat, making the preparation process significantly simpler and less time-consuming.
The benefits of no-bake desserts extend beyond convenience. For those who may feel intimidated by the thought of baking, no-bake recipes offer a straightforward approach to creating delicious treats without the complexity of measuring baking times and temperatures. Additionally, the absence of an oven means you can whip up these desserts any time of year, regardless of the season. Whether it’s a hot summer day or a chilly winter evening, no-bake desserts remain a refreshing option.
Key Ingredients in Oreo Cheesecake Cups
Creating the perfect Decadent No-Bake Oreo Cheesecake Cups relies on a handful of key ingredients, each playing a crucial role in achieving that rich, indulgent flavor and creamy texture.
1. Oreo Cookies: The star ingredient of this recipe, Oreo cookies not only provide an unmistakable flavor but also create a delightful texture for the crust. Their chocolatey crunch complements the creamy filling beautifully, making each bite a harmonious blend of flavors.
2. Cream Cheese: As the base of the cheesecake filling, cream cheese is essential for achieving the desired creaminess. It’s important to use softened cream cheese to ensure a smooth blend when combined with the other ingredients.
3. Heavy Whipping Cream: This ingredient adds lightness and volume to the filling. By whipping the heavy cream to soft peaks before folding it into the cream cheese mixture, you’ll achieve a fluffy texture that elevates the overall dessert.
4. Powdered Sugar: For sweetness without any graininess, powdered sugar is the preferred choice. It dissolves easily into the cream cheese, ensuring that the filling remains smooth and creamy.
5. Vanilla Extract: A splash of vanilla extract enhances the overall flavor profile, lending a subtle warmth that perfectly complements the rich chocolate and cream.
Step-by-Step Guide to Making Oreo Cheesecake Cups
Now that we’ve covered the essentials, let’s dive into the step-by-step process of making your Decadent No-Bake Oreo Cheesecake Cups. Follow these instructions carefully to create a dessert that will impress friends and family alike.
Preparing the Crust
Start by preparing the Oreo crust, which forms the foundation of your cheesecake cups. Begin by taking about 24 Oreo cookies (or more, depending on how many cups you wish to make) and placing them in a food processor. Pulse the cookies until they turn into fine crumbs. If you don’t have a food processor, you can also place the cookies in a zip-top bag and crush them with a rolling pin.
Once you have your cookie crumbs, transfer them to a mixing bowl and add approximately 4 tablespoons of melted butter. The melted butter acts as a binding agent, helping the crumbs hold together. Mix the crumbs and butter until they are well combined and resemble wet sand.
Next, you’ll want to portion the crust into individual serving cups. You can use small glass jars, dessert cups, or even shot glasses for a fun presentation. Spoon the Oreo mixture into each cup, pressing it down firmly to create an even layer. A small measuring cup or the back of a spoon works well for this step. Ensure that the crust is tightly packed to provide a stable base for the cheesecake filling.
Making the Cheesecake Filling
Now that your crusts are ready, it’s time to create the luscious cheesecake filling. Start by placing 16 ounces of softened cream cheese in a large mixing bowl. Using an electric mixer, beat the cream cheese on medium speed until it is smooth and creamy, free of any lumps. This step is crucial, as a well-blended cream cheese will lead to a silky filling.
Once the cream cheese is at the desired consistency, gradually add in ½ cup of powdered sugar, followed by 1 teaspoon of vanilla extract. Continue to mix until the sugar is fully incorporated. The filling should be sweet and smooth at this point.
In a separate bowl, pour in 1 cup of heavy whipping cream. Using a whisk or an electric mixer, whip the cream until soft peaks form. Be careful not to over-whip, as you want to maintain a light and airy texture. Once the cream is whipped, gently fold it into the cream cheese mixture using a spatula. This folding technique is essential for retaining the volume of the whipped cream, which is what gives the cheesecake its lightness.
With the filling prepared, it’s time to assemble your Oreo cheesecake cups. Spoon the creamy filling over the crust in each cup, filling them generously. For an extra touch, you can reserve some crushed Oreos to sprinkle on top of the filling before chilling.
Now that your cups are assembled, cover them with plastic wrap or lids if you’re using jars, and place them in the refrigerator. Allow them to chill for at least 4 hours, or overnight if possible, to ensure they set properly.
By following these steps, you’ll be well on your way to creating delightful Decadent No-Bake Oreo Cheesecake Cups that are sure to impress. As you prepare to serve these delicious treats, get ready to delight your taste buds with every creamy, chocolatey bite.
{{image_2}}
Creating the perfect No-Bake Oreo Cheesecake Cups is not just about the ingredients but also the techniques that ensure a smooth, creamy, and delightful dessert. As we move into the assembly and finishing touches of this recipe, let’s explore the essential steps and creative serving ideas that will make your cheesecake cups a standout treat.
Whipping the Cream: Perfect Peaks for a Fluffy Cheesecake
One of the key components to achieving that luscious texture in your No-Bake Oreo Cheesecake Cups is properly whipping the cream. The right technique and temperature are crucial for creating those perfect peaks. Begin by ensuring that your heavy cream is cold; this is essential for the best whipping results.
1. Chill Your Equipment: Before you start, place your mixing bowl and beaters in the freezer for about 10-15 minutes. A cold bowl helps the cream whip faster and achieve maximum volume.
2. Whipping Technique: Pour the chilled heavy cream into the cold mixing bowl. Start whipping at a low speed to prevent splattering, then gradually increase to medium-high. Keep an eye on the cream; it should start to thicken and form soft peaks. This usually takes around 3-5 minutes.
3. Achieving Stiff Peaks: Continue whipping until you reach stiff peaks, where the cream holds its shape well. Be cautious not to overwhip, as this can lead to butter forming instead of a fluffy consistency.
Once your cream is whipped to perfection, set it aside. This step is vital as it will be folded into the cream cheese mixture, adding lightness and a delightful mouthfeel to the cheesecake cups.
Assembling the Cups: Portion Sizes and Even Tops
With your whipped cream ready, it’s time to assemble your cheesecake cups. This part of the process is where you can get creative while ensuring each cup is filled evenly and beautifully.
1. Determine Portion Sizes: Depending on the size of your serving cups (typically 4-ounce or 8-ounce), measure out the cheesecake filling to ensure even distribution. For a standard 4-ounce cup, you will want to use about 1/4 cup of the cheesecake mixture.
2. Layering Technique: Start by adding a layer of the crushed Oreo cookie base at the bottom of each cup. Follow with a layer of the cheesecake mixture, smoothing the top with a spatula. Repeat the layers until you reach the top of the cup, finishing with a layer of cheesecake.
3. Achieving an Even Top: For a polished look, use a spatula or the back of a spoon to smooth the top of each cup. This not only enhances the visual appeal but also prepares them for any garnishes you may want to add later.
Chilling the Cheesecake: The Significance of Chilling Time
After assembling your cheesecake cups, the next crucial step is chilling. This process allows the flavors to meld and the texture to set properly.
1. Chill Time: Cover the assembled cheesecake cups with plastic wrap or place them in an airtight container. Chill in the refrigerator for at least 4 hours, but if you have the time, overnight is even better. This extended chilling period ensures the cheesecake sets fully, resulting in a firmer texture that holds up beautifully when served.
2. Why Chilling Matters: During the chilling time, the flavors deepen, and the cream cheese mixture solidifies, creating a rich and indulgent dessert experience. Skipping this step might leave you with a runny consistency that won’t hold its shape when served.
Creative Serving Suggestions
To elevate your Decadent No-Bake Oreo Cheesecake Cups, consider these creative serving suggestions that will not only enhance the presentation but also add delightful flavor contrasts.
Garnishing and Presentation Ideas
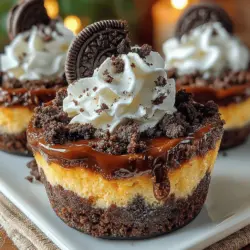
– Classic Finish: Top each cup with a dollop of whipped cream and a sprinkle of crushed Oreos. This not only looks attractive but also reinforces the Oreo flavor in every bite.
– Festive Presentations: For special occasions, serve the cheesecake cups on decorative platters. Add chocolate shavings or drizzles of chocolate sauce over the top for an elegant touch. You could even use edible glitter for a sparkly effect during celebrations.
– Alternative Toppings: Consider varying the toppings based on the season or occasion. Fresh berries like strawberries, raspberries, or blueberries can add a refreshing contrast to the richness of the cheesecake. A drizzle of caramel sauce or a sprinkle of chopped nuts also works well for those who love that extra layer of flavor.
Storage and Shelf Life
To keep your Decadent No-Bake Oreo Cheesecake Cups fresh and delicious, proper storage is essential.
Storing the Cheesecake Cups
– Refrigeration: Store the cheesecake cups in the refrigerator, covered with plastic wrap or in an airtight container. They can last for up to 5 days, allowing you to enjoy them throughout the week.
– Freezing for Later: If you want to make your cheesecake cups ahead of time, they can be frozen as well. Freeze them in an airtight container for up to 2 months. To thaw, simply transfer them to the refrigerator for several hours or overnight before serving. Avoid refreezing once thawed to maintain the best texture.
Why You’ll Love These Decadent No-Bake Oreo Cheesecake Cups
These No-Bake Oreo Cheesecake Cups are an irresistible dessert that combines creamy, rich flavors with the delightful crunch of Oreos. Here’s why you’ll fall in love with them:
1. Flavor and Texture: The combination of creamy cheesecake with the crispy Oreo base creates a perfect balance of textures. Each spoonful offers a burst of chocolate and creaminess that is simply satisfying.
2. Versatility: These cheesecake cups are perfect for any occasion, whether it’s a birthday party, holiday gathering, or just a cozy family dessert night. Their individual servings make them easy to share and enjoy.
3. Personal Touch: Many who have tried this recipe rave about its simplicity and deliciousness. You can customize the flavors by incorporating different toppings or even swapping out the Oreos for other favorite cookies, making each batch uniquely yours.
Conclusion
Making Decadent No-Bake Oreo Cheesecake Cups is not only easy but also incredibly rewarding. With a few simple steps and techniques, you can create a delightful dessert that is sure to impress family and friends. The combination of rich flavors, creamy textures, and customizable toppings allows for creativity while remaining stress-free.
I encourage you to try this recipe and experience the joy of crafting your own no-bake cheesecake cups. There’s nothing quite like sharing homemade treats with loved ones and watching their faces light up with delight. So gather your ingredients, follow the steps, and savor the happiness that comes with each delicious bite. Happy baking!