
Delightful Pear Bliss Tart: A Perfect Autumn Dessert
The Pear Bliss Tart is a delightful dessert that captures the essence of autumn through its rich flavors and comforting textures. This tart combines the natural sweetness of ripe pears with a buttery crust and aromatic spices, creating a dish that is not only visually appealing but also a feast for the palate. Perfect for gatherings, celebrations, or a cozy night in, the Pear Bliss Tart embodies the spirit of the season and serves as a beautiful centerpiece.
As the leaves turn and the air cools, seasonal fruits like pears become increasingly prominent in our kitchens. Incorporating these fruits into desserts not only enhances their flavors but also adds a nutritional boost. Pears, with their juicy texture and sweet yet slightly tangy profile, are particularly well-suited for baking, making them a fantastic choice for this tart. This article will guide you through the process of creating a Pear Bliss Tart, from understanding the allure of pears to preparing the tart shell and sautéing the pears for the perfect finish.
The Allure of Pears in Baking
Pears are more than just a delicious fruit; they are a powerhouse of nutrition. Rich in dietary fiber, vitamins C and K, and antioxidants, pears contribute to digestive health and can help reduce the risk of chronic diseases. Their unique flavor profile—ranging from sweet to subtly spicy—allows them to shine in various recipes, particularly desserts.
When selecting pears for baking, it’s essential to choose the right variety. Bartlett, Bosc, and Anjou pears are popular choices due to their firm texture and ability to hold up under heat. During the fall months, pears are in peak season, offering the best flavor and sweetness. Incorporating seasonal fruits not only enhances the taste of your desserts but also supports local agriculture and sustainability.
Ingredients Breakdown
Creating the perfect Pear Bliss Tart requires a selection of high-quality ingredients, each playing a vital role in the overall flavor and texture of the dish.
1. Pears: The star of the tart, ripe yet firm pears are essential. Their natural sweetness and moisture add depth to the dessert while ensuring the tart remains succulent without becoming soggy.
2. Pie Crust: You have the option of using a pre-made pie crust for convenience or making a homemade pastry for a more personalized touch. Each choice has its merits, but a homemade crust can provide a flaky texture that complements the filling beautifully.
3. Sweetening Agents: Brown sugar and maple syrup are used to enhance the natural sweetness of the pears. Brown sugar adds a hint of caramel flavor, while maple syrup contributes a warm, earthy sweetness that balances the tartness of the fruit.
4. Flavor Enhancers: Vanilla extract, cinnamon, nutmeg, and lemon juice are essential for elevating the flavors of the tart. Vanilla and spices add warmth, while lemon juice brightens the overall profile, preventing the tart from becoming overly sweet.
5. Optional Elements: For added texture, consider incorporating walnuts into the filling. They provide a delightful crunch that contrasts beautifully with the tender pears.
Preparing the Tart Shell
Once you have gathered your ingredients, the next step is preparing the tart shell. If you opt for a pre-made pie crust, ensure it is well-thawed and ready to use. Follow these steps for a perfect base:
1. Preheat the Oven: Begin by preheating your oven to 375°F (190°C). A hot oven is crucial for achieving a golden-brown crust.
2. Fit the Crust: Gently press the pre-made pie crust into a tart pan, ensuring it covers the bottom and sides evenly. Trim any excess crust hanging over the edges.
3. Chill the Shell: For the best results, chill the tart shell in the refrigerator for about 30 minutes. This step helps prevent shrinkage during baking and ensures a crisp texture.
If you prefer to make a homemade tart shell, here’s a quick guide:
1. Ingredients: Combine 1 ½ cups of all-purpose flour, ½ cup of unsalted butter (cold and cubed), and ¼ cup of sugar in a mixing bowl. Add a pinch of salt for flavor.
2. Mixing: With a pastry cutter or your fingertips, work the butter into the flour mixture until it resembles coarse crumbs. Gradually add ice water, one tablespoon at a time, until the dough comes together.
3. Chill: Form the dough into a disc, wrap it in plastic wrap, and refrigerate for at least one hour. This chilling time is essential for developing a flaky texture.
4. Roll Out: After chilling, roll the dough out on a lightly floured surface until it’s about 1/8 inch thick. Carefully transfer it to the tart pan, pressing it into the corners.
Sautéing Pears to Perfection
With your tart shell ready, it’s time to sauté the pears, which will infuse them with flavor and soften their texture. Follow these steps for perfectly sautéed pears:
1. Prepare the Pears: Peel, core, and slice the pears into even pieces. Aim for around ¼-inch thickness to ensure they cook evenly.
2. Heat the Pan: In a large skillet, melt 2 tablespoons of butter over medium heat. Allow the butter to sizzle but not brown.
3. Add the Pears: Once the butter is melted, add the sliced pears to the skillet. Stir gently to coat them in the butter.
4. Sweeten and Spice: Sprinkle in ¼ cup of brown sugar, a dash of cinnamon, and a pinch of nutmeg. Stir the mixture to combine, allowing the sugar to dissolve and create a syrup around the pears.
5. Sauté: Cook the pears for about 5-7 minutes, stirring occasionally until they begin to soften but still hold their shape. You want them tender yet intact, as they will continue to cook in the oven.
By following these initial steps, you are well on your way to creating a delightful Pear Bliss Tart that will impress your guests and satisfy your sweet cravings. As we continue, we will dive deeper into assembling the tart, baking, and presenting this autumnal treat. Stay tuned for the next part of our delicious journey.
{{image_2}}
The Impact of Caramelization on Flavor Enhancement
Caramelization is a crucial technique that transforms simple ingredients into something extraordinarily flavorful. When you cook the pears for the Pear Bliss Tart, the natural sugars in the fruit undergo caramelization, resulting in a rich, complex flavor profile. As the sugars heat, they develop a deeper hue and an irresistible sweetness, enhancing the overall taste of the tart. This process not only adds depth but also creates a delightful contrast between the sweet, caramelized pears and the tartness of the pastry, making every bite a luxurious experience.
Incorporating caramelized pears into your tart not only elevates the flavor but also enhances the texture. The tender, juicy pears meld beautifully with the buttery crust, creating a symphony of flavors that will leave your guests raving. If desired, you can also add a splash of vanilla extract or a sprinkle of cinnamon during the sautéing process to deepen the flavor further.
Optional Ingredient Spotlight: Incorporating Walnuts
While the Pear Bliss Tart is delightful on its own, adding walnuts can introduce a satisfying crunch and a nutty flavor that complements the sweetness of the pears. Walnuts are not only delicious but also packed with healthy fats, antioxidants, and essential nutrients. Simply chop a cup of walnuts and mix them in during the caramelization process or sprinkle them over the sautéed pears before assembling the tart.
Incorporating walnuts can provide a textural contrast that enhances the overall experience of the tart. The slight bitterness of walnuts balances the sweetness of the pears, creating a well-rounded dessert. If you have guests with nut allergies, feel free to omit this ingredient, as the tart remains exquisite without it.
Assembling the Pear Bliss Tart
Techniques for Arranging the Sautéed Pears
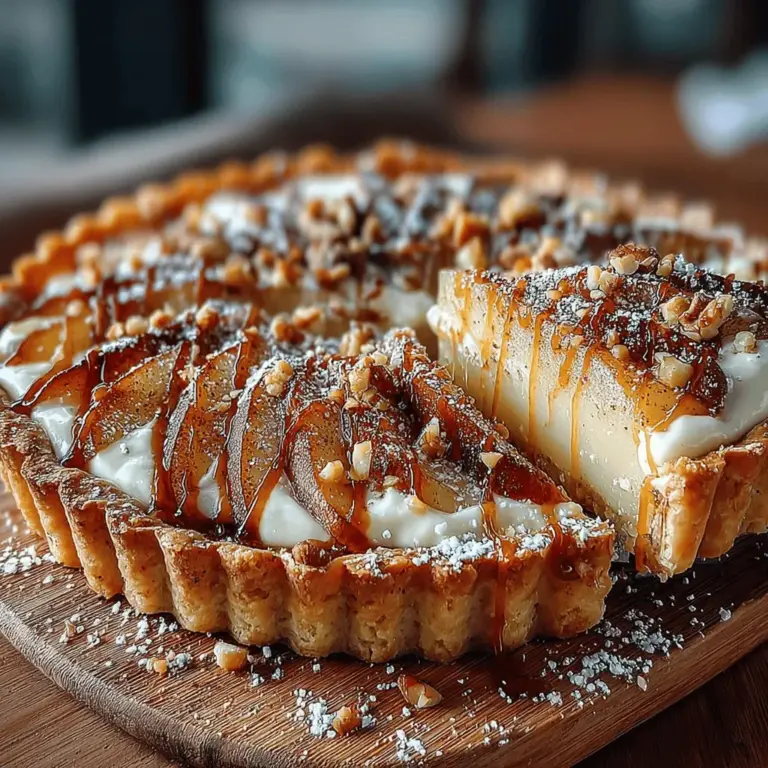
As you prepare to assemble your Pear Bliss Tart, the arrangement of the sautéed pears is crucial for both aesthetics and flavor distribution. Begin by layering the caramelized pears in a circular pattern, starting from the outer edge and working your way towards the center. This method not only creates a visually appealing design but also ensures each slice has an equal share of pears.
To enhance the visual appeal, consider fanning the pears out slightly, allowing their beautiful golden-brown color to shine through. If you opted for walnuts, now is the time to sprinkle them evenly over the arranged pears. This technique will guarantee that every slice of tart encompasses the delightful combination of flavors and textures.
Importance of Even Distribution for Visual Appeal and Flavor
Even distribution of ingredients is essential for both the visual appeal and the flavor profile of the Pear Bliss Tart. When the pears and walnuts are spread uniformly, each slice will be consistent in taste, allowing everyone to enjoy the perfect balance of flavors. A well-arranged tart not only looks stunning but also invites anticipation from those who will be indulging in it.
Baking the Tart
Optimal Baking Conditions: Temperature and Time
Once the assembly is complete, it’s time to bake the tart. Preheat your oven to 375°F (190°C). This temperature allows the crust to develop a golden brown color while ensuring the pears cook through without becoming overly mushy. Bake the Pear Bliss Tart for approximately 35-40 minutes, or until the crust is golden and the pears are tender.
Signs to Look for to Know When the Tart is Ready
To determine if your tart is ready, pay attention to visual cues. The crust should be a beautiful golden brown, and the edges should be slightly puffed. You can also gently press on the surface; if it feels firm yet slightly springy, it’s likely done. Additionally, the fragrant aroma of caramelized pears will fill your kitchen, serving as a delicious reminder that your dessert is close to perfection.
How to Achieve a Golden Brown Crust
Achieving a golden brown crust is all about timing and temperature. If you notice that the crust is browning too quickly, you can cover the edges with aluminum foil to prevent burning while allowing the center to continue baking. For a final touch, you can brush the crust with a mixture of egg wash (one beaten egg with a splash of water) before baking, which will contribute to a shiny, appealing finish.
Creating the Maple Mascarpone
Ingredients and Preparation Steps for the Maple Mascarpone
The creamy maple mascarpone is the perfect complement to the Pear Bliss Tart, providing a rich and velvety contrast to the caramelized pears. To make this delightful topping, you will need:
– 1 cup mascarpone cheese
– 3 tablespoons maple syrup
– 1 teaspoon vanilla extract
– A pinch of sea salt
In a mixing bowl, combine the mascarpone cheese, maple syrup, vanilla extract, and sea salt. Using a whisk or electric mixer, blend until smooth and creamy. Taste and adjust the sweetness by adding more maple syrup if desired. This topping can be made in advance and stored in the refrigerator until you’re ready to serve.
Flavor Balancing with Maple Syrup and Sea Salt
The addition of sea salt to the maple mascarpone enhances the flavor by balancing the sweetness of the maple syrup. This sweet-salty contrast adds depth and complexity to the mascarpone, making it an irresistible pairing for the tart. Feel free to experiment with the amount of maple syrup and sea salt to find the perfect balance for your palate.
Suggestions for Variations
While the maple mascarpone is delicious as is, you can personalize it further by adding spices or citrus zest. A pinch of cinnamon or nutmeg can warm the flavors, while a teaspoon of lemon or orange zest brings a bright, refreshing note. These simple additions can elevate your mascarpone and add a unique twist to your Pear Bliss Tart experience.
Serving Suggestions
Best Practices for Cooling and Slicing the Tart
Once your Pear Bliss Tart has finished baking, allow it to cool in the pan for about 10-15 minutes before transferring it to a wire rack. This cooling period helps to set the filling and makes slicing easier. When ready to serve, use a sharp knife to cut the tart into even slices, ensuring that each portion contains a delightful combination of crust and pears.
Presentation Ideas: Serving with Maple Mascarpone and Optional Toppings
For an elegant presentation, serve each slice of the Pear Bliss Tart with a generous dollop of maple mascarpone on the side. You can also drizzle additional maple syrup over the tart for an extra touch of sweetness. If you have opted to include walnuts, sprinkle some chopped walnuts on top for a lovely garnish that adds both flavor and texture.
Alternative Serving Options: Pairing with Vanilla Ice Cream or Extra Walnuts
For those who prefer a warm dessert experience, consider serving the Pear Bliss Tart with a scoop of vanilla ice cream. The cool creaminess of the ice cream pairs beautifully with the warm, caramelized pears and flaky crust, creating a delightful contrast. Alternatively, you can serve the tart with a sprinkle of extra walnuts on top for a satisfying crunch.
The Perfect Occasion for Pear Bliss Tart
Ideal Settings for Serving This Dessert
The Pear Bliss Tart is the quintessential dessert for a variety of occasions. Whether it’s a family gathering, holiday celebration, or intimate dinner party, this tart is sure to impress your guests. Its sophisticated flavors and beautiful presentation make it the perfect ending to any meal.
How This Tart Fits into Seasonal Celebrations and Autumn Themes
With its warm, comforting flavors, the Pear Bliss Tart is especially suited for autumn gatherings and celebrations. The use of fresh, seasonal pears aligns perfectly with fall themes, making it a great choice for Thanksgiving dinners or harvest festivals. Serve it alongside other seasonal favorites, and watch as it becomes the highlight of your dessert table.
Conclusion
The Pear Bliss Tart is a delightful blend of flavors and textures, showcasing the natural sweetness of caramelized pears and the creamy richness of maple mascarpone. This recipe not only highlights the beauty of seasonal ingredients but also invites creativity in the kitchen. You can experiment with variations, whether it’s adding nuts or spices, to make this tart truly your own.
Baking with fresh, seasonal ingredients brings joy and satisfaction, allowing you to create memorable experiences for yourself and those you share your culinary creations with. So, gather your ingredients, embrace the art of baking, and indulge in the delightful flavors of the Pear Bliss Tart. Enjoy the process, and don’t hesitate to make it your own!
