Chilly Delight: Frozen Yogurt Banana Walnut Bars
When the sun blazes high, and you’re in need of a refreshing treat, nothing beats the satisfaction of a chilled snack. Enter the Frozen Yogurt Banana Walnut Bars—a delightful concoction that marries the creaminess of Greek yogurt with the natural sweetness of ripe bananas and the crunch of walnuts. This recipe is not only an indulgence but also a nourishing option that fits seamlessly into a balanced diet. Whether you’re looking for a post-workout recovery snack, a healthy dessert option, or simply a delicious way to cool down, these bars are sure to impress.
In our modern world, the importance of healthy snacking cannot be overstated. With the prevalence of processed snacks that are high in sugar and unhealthy fats, it’s crucial to turn to alternatives that promote well-being. The Frozen Yogurt Banana Walnut Bars stand out as a wholesome choice, offering a delightful balance of flavors and nutrients. They are easy to prepare, customizable, and perfect for anyone who enjoys a guilt-free treat.
At the heart of this recipe are three key ingredients: bananas, Greek yogurt, and walnuts. Each plays a vital role in not only enhancing the flavor but also contributing to the health benefits of the bars. Bananas provide natural sweetness and are rich in potassium, Greek yogurt is packed with protein and probiotics, and walnuts offer healthy fats that support heart health. Together, they create a delicious snack that satisfies your sweet tooth while nourishing your body.
The Benefits of Frozen Yogurt Banana Walnut Bars
Let’s delve into the health benefits of the ingredients that make up these Frozen Yogurt Banana Walnut Bars. First on the list is Greek yogurt, which is known for its impressive nutritional profile. Unlike regular yogurt, Greek yogurt undergoes a straining process that removes much of the whey, resulting in a thicker texture and higher protein content. This makes it an excellent option for those looking to increase their protein intake while enjoying a creamy treat. The probiotics present in Greek yogurt also support digestive health, making these bars a gut-friendly snack.
Next, we have bananas, which are often hailed as a superfruit. These tropical beauties are not only convenient to eat on the go, but they are also a great source of essential vitamins and minerals, including vitamin C, vitamin B6, and potassium. Bananas are known for their energy-boosting properties, making them an ideal choice for athletes and active individuals. Furthermore, their natural sweetness reduces the need for added sugars, allowing you to enjoy a dessert that doesn’t compromise your health.
Walnuts are the third star of this recipe, bringing a delightful crunch and a wealth of health benefits. These nuts are an excellent source of omega-3 fatty acids, which are known to support heart health by reducing inflammation and lowering blood pressure. Regular consumption of walnuts has also been linked to improved brain health, making them a smart addition to your diet. When combined with the other ingredients, walnuts not only enhance the taste and texture of the bars but also contribute to the overall nutritional value.
Compared to traditional desserts and snacks, the Frozen Yogurt Banana Walnut Bars emerge as a standout option. Many conventional treats are laden with refined sugars and unhealthy fats, which can lead to energy crashes and weight gain. In contrast, this recipe provides a satisfying alternative that keeps you feeling full and energized without the guilt. The natural ingredients work together to create a balanced snack that can easily become a staple in your kitchen.
Gathering the Ingredients: What You’ll Need
Before you embark on your culinary adventure, it’s essential to gather all the necessary ingredients for your Frozen Yogurt Banana Walnut Bars. Here’s a detailed list of what you’ll need, along with some potential substitutions for those who may have dietary restrictions or preferences:
– Ripe Bananas: You’ll need about three large ripe bananas for this recipe. Ripeness matters because the sweeter the bananas, the less additional sweetener you’ll need. Look for bananas with brown spots, as they are at their peak sweetness.
– Greek Yogurt: Choose plain Greek yogurt for this recipe. You can opt for full-fat, low-fat, or fat-free based on your dietary preferences. For a tangier flavor, consider using a yogurt that contains live cultures.
– Honey or Maple Syrup: While honey adds a natural sweetness and a hint of floral flavor, maple syrup is another excellent alternative that is vegan-friendly. Both options work well in this recipe, so you can choose according to your taste preference.
– Chopped Walnuts: About one cup of chopped walnuts will add the perfect crunch to your bars. If you’re nut-free or have allergies, consider using seeds like sunflower seeds or pumpkin seeds as a substitute.
– Optional Chocolate Chips: For those who enjoy a touch of sweetness, adding dark chocolate chips can elevate the flavor profile of the bars. Choose high-quality dark chocolate for a richer taste and additional health benefits.
– Quality Ingredients: The foundation of any great recipe lies in the quality of its ingredients. Fresh, organic produce will yield the best flavor and nutritional value. Whenever possible, opt for locally sourced ingredients to support your community and ensure freshness.
Now that you have your ingredients ready, it’s time to move on to the exciting part—preparing your Frozen Yogurt Banana Walnut Bars. Follow these step-by-step instructions to create a deliciously refreshing treat that you and your family will love.
Step-by-Step Instructions for Making Frozen Yogurt Banana Walnut Bars
1. Prepare the Bananas: Start by peeling the ripe bananas and placing them in a mixing bowl. Use a fork or a potato masher to mash the bananas until they reach a smooth, creamy consistency. This will serve as the base for your bars and provide natural sweetness.
2. Combine the Yogurt: Next, add the Greek yogurt to the mashed bananas. Stir until the mixture is well combined, ensuring that there are no lumps. This creamy blend will give your bars their rich texture.
3. Sweeten the Mix: Depending on your taste preferences, drizzle in your choice of honey or maple syrup. Mix well to incorporate the sweetener into the banana-yogurt mixture. Taste the mixture and adjust the sweetness if needed.
4. Add the Walnuts: Fold in the chopped walnuts gently, ensuring they are evenly distributed throughout the mixture. If you’re using chocolate chips, this is the time to add them as well.
5. Prepare the Baking Dish: Line an 8×8 inch or 9×9 inch baking dish with parchment paper, allowing some overhang for easy removal later. This will prevent the bars from sticking and make cleanup a breeze.
6. Pour and Spread: Pour the banana-yogurt mixture into the prepared baking dish. Use a spatula to spread the mixture evenly across the dish, smoothing the top for a uniform appearance.
7. Freeze: Place the baking dish in the freezer and allow the mixture to freeze for at least 4 hours, or until solid. This freezing step is crucial for achieving the perfect texture for your bars.
As you embark on this journey to create your Frozen Yogurt Banana Walnut Bars, you’ll soon discover how simple it is to enjoy a delicious snack that aligns with your health goals. The combination of wholesome ingredients, ease of preparation, and the satisfaction of indulging in a homemade treat makes this recipe a must-try for anyone seeking a delightful and nutritious snack. Stay tuned for the next part of the recipe, where we’ll delve into cutting and serving these delicious bars!
{{image_2}}
Preparing the Bananas: Techniques for Mashing
The first step in creating your Frozen Yogurt Banana Walnut Bars is to prepare the bananas. Selecting ripe bananas is key; look for bananas with a few brown spots, as they will be sweeter and easier to mash.
To mash bananas effectively, you can use a fork or a potato masher. If you prefer a smoother texture, place the bananas in a mixing bowl and use a hand mixer on low speed until you achieve the desired consistency. A smooth puree will blend seamlessly into the yogurt mixture, providing a creamy base. Alternatively, you can use a food processor for a quick and efficient method, ensuring that no lumps remain.
Combining Ingredients: Achieving the Right Creamy Consistency
Once your bananas are perfectly mashed, it’s time to combine them with the yogurt. For this recipe, Greek yogurt is recommended due to its thick, creamy texture and high protein content, which enhances the nutritional profile of your bars.
In a large mixing bowl, combine the mashed bananas and yogurt. For added sweetness, consider mixing in a natural sweetener such as honey or maple syrup. Start with a small amount and adjust to taste. Use a spatula or a whisk to blend the ingredients until smooth and creamy. If you desire a hint of flavor, adding a teaspoon of vanilla extract will elevate your bars to the next level.
Incorporating Walnuts: Tips for Folding in Nuts and Optional Chocolate Chips
Now that your yogurt and banana mixture is ready, it’s time to fold in the walnuts. Chop the walnuts coarsely to add texture without overwhelming the other flavors. Gently fold them into the mixture using a spatula to ensure even distribution without deflating the yogurt.
If you’re feeling indulgent, consider adding dark chocolate chips. They provide a delightful contrast to the sweetness of the bananas and the nuttiness of the walnuts. Aim for about half a cup of chocolate chips, folding them in just like the walnuts to maintain the creamy consistency of the mixture.
Lining the Pan: Best Practices for Easy Removal
Lining the pan is a crucial step to ensure that your bars come out easily after freezing. Start with an 8×8-inch square baking dish or a similar-sized pan. Line the bottom and sides with parchment paper, leaving some overhang on the edges. This will create convenient “handles” for lifting the bars out once they are frozen.
To further ensure easy removal, lightly spray the parchment paper with non-stick cooking spray. This step is especially helpful if you’re using a non-stick pan, as it reduces the chance of the yogurt mixture sticking to the sides.
Pouring and Spreading: Ensuring an Even Layer
With your pan lined, it’s time to pour the banana-yogurt mixture into the prepared baking dish. Use a spatula to scoop the mixture from the bowl and gently pour it into the center of the pan. Spread the mixture evenly across the surface, ensuring that it reaches the corners. A smooth and even layer will result in uniform bars once sliced.
To create a professional finish, tap the pan gently on the counter. This action helps eliminate any air bubbles that may have formed, ensuring a denser texture.
Freezing Process: Importance of Proper Freezing Time
Freezing the bars is essential for achieving that perfect frozen treat consistency. Place the pan in the freezer and allow the mixture to freeze for at least 4-6 hours, or until completely firm. For best results, overnight freezing is recommended. This extended time will ensure that your bars are solid enough to slice without crumbling.
It’s important to cover the pan with plastic wrap or aluminum foil after about an hour of freezing. This step helps prevent ice crystals from forming on the surface and preserves the creamy texture of your bars.
Slicing and Serving: Techniques for Perfect Bar Cuts
Once the bars are fully frozen, it’s time to slice them into perfect squares. Start by lifting the bars out of the pan using the parchment paper overhang. Place the block on a cutting board. For best results, use a sharp knife that has been warmed under hot water. This technique will make cutting through the frozen bars easier and will help avoid crumbling.
Slice the bars into squares or rectangles, depending on your preferred size. If you want to make smaller bite-sized portions, consider cutting them into smaller squares. You can store the sliced bars back in the freezer in an airtight container, layering them with parchment paper to prevent sticking.
Presentation Ideas for the Frozen Yogurt Bars
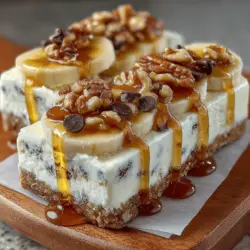
Presentation is key when serving your Frozen Yogurt Banana Walnut Bars, especially if you’re entertaining guests. Consider placing the bars on a decorative platter, arranging them in a fan shape or a neat grid.
For an added touch of elegance, garnish each bar with a few sparkling walnuts and banana slices. You can achieve a sparkling effect by tossing the walnuts in a bit of sugar before sprinkling them on the bars. Fresh mint leaves can also add a pop of color and freshness to the presentation.
For gatherings or parties, serve the bars on individual plates or in cupcake liners to make them easy for guests to grab. Pair the bars with a drizzle of chocolate sauce or a dollop of whipped cream to elevate the dessert.
Storage and Shelf Life of Frozen Yogurt Bars
To keep your Frozen Yogurt Banana Walnut Bars fresh, store any leftovers in an airtight container in the freezer. This method will keep them from absorbing odors and maintain their flavor. Proper storage can extend their shelf life up to 2-3 months, although they are best enjoyed within the first month for optimal freshness.
Understanding the freezing process is essential; the texture of yogurt can change if it’s not stored correctly. To maintain the creamy consistency, ensure that you are not repeatedly thawing and refreezing the bars, as this can lead to them becoming icy and losing their appealing texture.
Conclusion
In summary, the Frozen Yogurt Banana Walnut Bars are not only a delicious treat but also a guilt-free indulgence that fits perfectly into a nutritious lifestyle. Packed with the goodness of bananas, walnuts, and yogurt, these bars are a fantastic way to satisfy sweet cravings while providing essential nutrients.
With their creamy texture and delightful flavor, these bars can easily become a staple in your freezer. Enjoy them as a post-workout snack, a midday pick-me-up, or a dessert after dinner. Embrace the healthy sweetness of these bars and feel great about what you’re eating. So, gather your ingredients, follow the steps, and treat yourself to a refreshing, nutritious snack that you can enjoy any time of the day.