Introduction
When it comes to indulgent desserts, few can rival the exquisite charm of Tiramisu. This iconic Italian treat has captured the hearts and taste buds of dessert lovers worldwide with its rich layers of coffee-soaked ladyfingers, velvety mascarpone cheese, and a dusting of cocoa powder. Its popularity has soared, making it a staple on dessert menus in restaurants, cafes, and homes alike. However, for those seeking a new way to experience this beloved dessert, the Heavenly Tiramisu Layer Cake offers a delightful twist that elevates the classic into something truly extraordinary.
This cake combines the beloved flavors of traditional Tiramisu with the appealing structure of a layered cake. Imagine sinking your fork into a slice that reveals alternating layers of moist chocolate cake and silky mascarpone cream, all infused with the robust essence of brewed espresso. It’s a dessert that’s perfect for special occasions, from birthdays to anniversaries, or even a cozy evening treat. The Heavenly Tiramisu Layer Cake not only brings a visual feast to your table but also delivers a rich and harmonious flavor experience that will leave everyone asking for seconds.
The Allure of Tiramisu
Historical Background of Tiramisu
The roots of Tiramisu trace back to the 1960s in the Veneto region of Italy, though its exact origins remain a subject of debate. Some culinary historians believe it was created in a small restaurant in Treviso, while others suggest that variations of the dessert existed long before its official inception. The name “Tiramisu” translates to “pick me up” in Italian, aptly reflecting the dessert’s stimulating combination of coffee and cocoa. Traditionally, Tiramisu consists of layers of coffee-dipped ladyfingers and a luscious mixture of egg yolks, sugar, and mascarpone cheese, all topped with a generous dusting of cocoa.
Over the years, Tiramisu has transcended its Italian roots, becoming a global sensation. Its adaptability has led to numerous variations, appealing to diverse palates—from classic recipes to inventive spins that incorporate flavors like fruit, chocolate, and even matcha. This versatility contributes to its enduring status as a beloved dessert around the world.
Traditional Ingredients and Their Significance
The beauty of Tiramisu lies not only in its taste but also in its simplicity. The traditional ingredients include:
– Ladyfingers (Savoiardi): These light, airy biscuits serve as the building blocks of the dessert, providing structure and the canvas for flavor absorption.
– Espresso: Brewed strong and rich, espresso is a key flavor component, providing that signature coffee kick that defines Tiramisu.
– Mascarpone Cheese: This soft Italian cheese is essential for achieving the smooth, creamy texture that makes Tiramisu so indulgent.
– Egg Yolks and Sugar: Together, they create a custard-like mixture that adds sweetness and richness.
– Cocoa Powder: Sprinkled on top, it not only enhances the visual appeal but also adds a bittersweet flavor that balances the dessert.
These ingredients come together to create a dessert that embodies the essence of Italian culinary tradition: simple yet elegant, rich yet light.
Why Tiramisu Remains a Beloved Dessert Worldwide
Tiramisu’s continued popularity can be attributed to its unique combination of flavors and textures. The contrast between the soft, coffee-soaked ladyfingers and the creamy mascarpone filling creates a delightful mouthfeel. Additionally, it’s a dessert that is easily customizable, allowing for creativity while maintaining its core identity. The ability to serve Tiramisu in various forms—whether in glasses, as a cake, or even as cupcakes—ensures that it can cater to any occasion.
Moreover, Tiramisu evokes a sense of nostalgia and warmth, often associated with family gatherings and celebrations. Its luxurious taste paired with the comforting familiarity of coffee makes it a favorite among dessert enthusiasts. Whether enjoyed on a special occasion or as a simple treat at home, Tiramisu continues to enchant dessert lovers everywhere.
Understanding the Key Ingredients
As we venture into creating the Heavenly Tiramisu Layer Cake, it’s essential to familiarize ourselves with the key ingredients that will bring this dessert to life.
Essential Ingredients for Heavenly Tiramisu Layer Cake
1. All-Purpose Flour: The base of the chocolate cake layer, providing structure.
2. Cocoa Powder: Adds a rich chocolate flavor that complements the coffee.
3. Baking Powder and Baking Soda: These leavening agents ensure the cake rises properly.
4. Unsalted Butter: Provides moisture and richness to the cake.
5. Granulated Sugar: Sweetens the cake and enhances its flavor.
6. Eggs: Bind the ingredients together and contribute to the cake’s texture.
7. Milk: Adds moisture and contributes to the cake’s tender crumb.
8. Brewed Espresso: The star ingredient that imparts the distinct coffee flavor.
9. Mascarpone Cheese: Essential for the creamy filling, lending that signature Tiramisu taste.
10. Vanilla Extract: Enhances the overall flavor profile.
11. Coffee Liqueur (optional): Adds depth and complexity to the coffee flavor.
The Role of Brewed Espresso in Imparting Flavor
Brewed espresso is crucial in creating the authentic Tiramisu flavor profile. Its deep, robust taste infuses the cake layers and the cream, ensuring that every bite is filled with the rich essence of coffee. When selecting espresso, opt for a high-quality brand that you enjoy drinking on its own, as this will significantly influence the final taste of your cake.
Importance of Mascarpone Cheese in Achieving Creamy Texture
Mascarpone cheese is the heart of any Tiramisu-inspired dessert. Its luscious, creamy texture and mild flavor make it the perfect base for the filling. Unlike other cheeses, mascarpone has a high-fat content, which contributes to the dessert’s decadence. When combined with whipped cream and other ingredients, it creates a light yet rich filling that beautifully contrasts with the chocolate cake layers.
Discussion on Optional Ingredients and Their Impact
While the essential ingredients are key to the recipe, optional ingredients like coffee liqueur can add an extra layer of flavor. Coffee liqueur enhances the coffee notes and provides a touch of sweetness. If you prefer a non-alcoholic version, feel free to omit it or substitute it with additional brewed espresso.
Preparing the Coffee Layer
Now that we have a solid understanding of the key ingredients, it’s time to dive into the preparation of the coffee layer, which is integral to achieving that authentic Tiramisu flavor in our cake.
Step-by-Step Guide on Making the Coffee Mixture
1. Brew the Espresso: Start by brewing a strong cup of espresso using a reputable coffee maker or espresso machine. Aim for about 1 cup of freshly brewed espresso to ensure a robust flavor.
2. Sweeten the Coffee (Optional): While the traditional Tiramisu does not require additional sugar, you may choose to sweeten your espresso to taste, particularly if you prefer a sweeter dessert.
3. Add Coffee Liqueur (Optional): If you’re incorporating coffee liqueur, mix it with the brewed espresso. The recommended ratio is typically 1/4 cup of coffee liqueur for every cup of espresso.
4. Allow to Cool: Let the coffee mixture cool to room temperature before using it to soak the cake layers. This prevents the cake from becoming soggy.
Tips on Selecting the Right Espresso and Coffee Liqueur
When selecting espresso, consider the roast level and flavor profile that you enjoy most. A medium to dark roast typically works best, as it offers a bold flavor that complements the chocolate cake. For coffee liqueur, popular options include Kahlúa or Tia Maria, but feel free to explore local brands that you enjoy.
Importance of Allowing Flavors to Meld Before Using
Allowing the coffee mixture to cool and meld for a few minutes enhances the flavor, as the aromas will develop and intensify. This step is crucial for ensuring that every layer of the cake is infused with the delightful essence of coffee, making each bite a true indulgence.
Crafting the Perfect Cake Batter
With the coffee layer prepared, we can now focus on creating the chocolate cake batter that will form the foundation of our Heavenly Tiramisu Layer Cake.
Detailed Instructions for Making the Chocolate Cake Batter
1. Preheat the Oven: Start by preheating your oven to 350°F (175°C). Prepare two 9-inch round cake pans by greasing them and lining the bottoms with parchment paper.
2. Whisk Dry Ingredients: In a large mixing bowl, whisk together the all-purpose flour, cocoa powder, baking powder, and baking soda. This step ensures even distribution of the leavening agents throughout the flour.
3. Cream Butter and Sugar: In another bowl, cream together the unsalted butter and granulated sugar until light and fluffy. This process typically takes about 3-5 minutes, and it’s essential for achieving a light cake texture.
4. Add Eggs: Beat in the eggs one at a time, ensuring that each egg is fully incorporated before adding the next. This helps create a homogenous batter.
5. Incorporate Dry Ingredients: Gradually add the dry ingredient mixture to the wet ingredients, alternating with the milk. Start and end with the flour mixture. Mix until just combined; overmixing can lead to a dense cake.
6. Add Vanilla Extract: Stir in the vanilla extract for added flavor.
The Significance of Using Room Temperature Eggs and Milk
Using room temperature eggs and milk is crucial for creating a uniform batter. Cold ingredients can cause the batter to seize, leading to uneven mixing and a dense cake. Allow eggs and milk to sit at room temperature for about 30 minutes before beginning your recipe for the best results.
Explanation of the Mixing Process and Why Overmixing Should Be Avoided
Mixing the batter until just combined is key to a light and fluffy cake. Overmixing can develop gluten in the flour, resulting in a chewy texture rather than the desired tender crumb. It’s better to err on the side of caution and mix only until the dry ingredients are incorporated.
Baking the Cakes to Perfection
With the cake batter ready, it’s time to bake our Heavenly Tiramisu Layer Cake to perfection.
Optimal Baking Conditions (Temperature and Time)
Pour the prepared cake batter evenly into the two prepared cake pans. Bake in the preheated oven for 25-30 minutes, or until a toothpick inserted into the center comes out clean. If your oven tends to run hot or cold, keep an eye on the cakes to prevent overbaking or underbaking.
How to Check for Doneness Using the Toothpick Method
The toothpick method is a reliable way to test for doneness. Insert a toothpick into the center of the cake; if it comes out clean or with a few moist crumbs, your cake is ready. If the toothpick is covered in wet batter, allow the cake to bake for a few more minutes.
—
This introduction and initial section of the Heavenly Tiramisu Layer Cake recipe offers a comprehensive understanding of this delightful dessert, its history, and the meticulous preparation required to achieve the best results. Stay tuned for the next part, where we’ll dive into assembling the layers and creating the creamy mascarpone filling that will bring this cake to life!
{{image_2}}
Cooling Techniques to Maintain Cake Structure
Once your cake layers are baked, it’s crucial to cool them properly to maintain their structure and moisture. Here are some cooling techniques to consider:
1. Cool in the Pan: Allow the cake layers to cool in their respective pans for about 10-15 minutes. This helps them set and makes it easier to remove them without breaking.
2. Transfer to a Wire Rack: After the initial cooling period, gently run a knife around the edges of the pan to loosen the cake, then invert it onto a wire rack. This step allows air to circulate around the cake, preventing sogginess and ensuring a uniform cooling process.
3. Cool Completely: Ensure the layers are completely cool before frosting. If they are still warm, the frosting can melt and lose its texture. Ideally, let the layers cool for at least an hour, or until they are at room temperature.
Creating the Luxurious Mascarpone Frosting
The mascarpone frosting is what elevates your Heavenly Tiramisu Layer Cake to new heights. Here’s how to prepare it:
Instructions for Preparing the Mascarpone Frosting
1. Ingredients: Gather 16 ounces of mascarpone cheese, 1 cup of heavy whipping cream, 1 cup of powdered sugar, and 1 teaspoon of vanilla extract.
2. Whip the Cream: In a large mixing bowl, start by whipping the heavy cream until soft peaks form. This will add lightness to your frosting.
3. Combine Mascarpone and Sugar: In another bowl, mix the mascarpone cheese, powdered sugar, and vanilla extract until smooth and creamy.
4. Fold Together: Gently fold the whipped cream into the mascarpone mixture. Use a spatula to combine these ingredients, being careful not to over-mix. This technique preserves the airiness of the whipped cream, ensuring a light and luxurious frosting.
Differences Between Folding and Mixing to Preserve Airiness
When it comes to mixing your mascarpone frosting, the technique you choose makes all the difference. Mixing vigorously can deflate the whipped cream, making the frosting denser. Instead, folding is a gentle method that incorporates ingredients without losing air. To fold:
– Use a spatula to scoop from the bottom of the bowl and lift the mixture over itself.
– Rotate the bowl as you go, ensuring even incorporation.
– Repeat until the ingredients are just combined, maintaining that fluffy texture.
Tips for Achieving the Right Consistency
1. Temperature Matters: Make sure the mascarpone is at room temperature to ensure a smooth blend with the whipped cream.
2. Adjust Sweetness: Taste your frosting and adjust the powdered sugar to your liking. The sweetness should balance well with the coffee layers of the cake.
3. Chill if Necessary: If your frosting seems too soft, place it in the refrigerator for about 15-20 minutes to firm up before using.
Layering and Assembling the Cake
The assembly of your Heavenly Tiramisu Layer Cake is a delightful process that requires a bit of finesse.
The Art of Slicing Cakes into Layers
To slice your cake layers evenly:
1. Use a Serrated Knife: This type of knife helps create clean cuts without tearing the cake.
2. Measure for Accuracy: You can use toothpicks to mark where you want to cut, ensuring each layer is even.
3. Turn the Cake: Rotate the cake as you slice, maintaining a steady hand to produce uniform layers.
Techniques for Brushing the Coffee Mixture onto the Layers
To infuse your cake layers with that signature tiramisu flavor, prepare a coffee mixture using strong brewed coffee combined with a splash of coffee liqueur if desired. Here’s how to apply it:
1. Brush Generously: Use a pastry brush to apply the coffee mixture generously to the top of each layer. This not only adds flavor but keeps the layers moist.
2. Soak but Don’t Drench: Be cautious not to over-soak the layers. You want them moist, but not falling apart.
Step-by-Step Assembly Instructions with Emphasis on Even Frosting
1. First Layer: Start with the first layer on your cake stand or serving platter. Brush the top with the coffee mixture.
2. Apply Frosting: Spread a generous layer of mascarpone frosting on top, smoothing it out evenly.
3. Repeat: Place the second layer on top, brush with coffee, and add more frosting. Repeat this process until all layers are stacked.
4. Top Layer: Once the final layer is in place, apply a thin crumb coat of frosting all over the cake to lock in crumbs. Chill for 30 minutes, then frost the top and sides more generously.
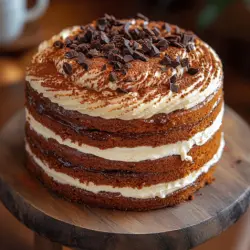
Decorating Your Tiramisu Layer Cake
A well-decorated cake enhances the overall dessert experience. Here are some creative ideas:
1. Dusting with Cocoa Powder: Use a fine mesh sieve to dust a layer of cocoa powder on top of the cake for that classic tiramisu look. This not only adds to the flavor but also provides a beautiful contrast against the white frosting.
2. Chocolate Shavings: Create chocolate shavings using a vegetable peeler on a chocolate bar. Scatter these over the top for an elegant finish.
3. Presentation Matters: Consider your serving plate and its aesthetic. A simple white plate can make the colors of your cake pop, while a dark plate provides a dramatic backdrop.
Suggestions for Serving Styles and Garnishing
– Individual Portions: For a more upscale presentation, slice the cake into individual servings and place them on small dessert plates. Garnish each with a sprinkle of cocoa powder and a few chocolate shavings.
– Add Fresh Berries: Fresh raspberries or strawberries can add a burst of color and a refreshing contrast to the rich flavors of the cake.
The Importance of Chilling
Chilling your tiramisu layer cake is critical for achieving the best flavor and texture.
Explanation of Why Chilling Enhances Flavor and Texture
Chilling allows the flavors to meld together beautifully. The mascarpone frosting firms up, making it easier to slice and serve. Additionally, the coffee flavor will deepen, enriching the overall taste.
Recommended Chilling Times for Optimal Results
For best results, chill your assembled cake for at least 4 hours, or overnight if possible. This longer chilling time allows the flavors to develop fully.
How to Store the Cake for Best Freshness
Cover the cake with plastic wrap or store it in an airtight container to prevent it from drying out. If you have leftover slices, they can be stored in the refrigerator for up to 3 days, but be sure to consume them within that timeframe for optimal flavor.
Serving Suggestions
Pairing your Heavenly Tiramisu Layer Cake with the right accompaniments can elevate the dining experience.
Ideal Accompaniments to the Heavenly Tiramisu Layer Cake
1. Coffee: A classic pairing for tiramisu, serving it alongside a cup of strong espresso enhances the flavor profile.
2. Dessert Wines: Consider pairing with a sweet dessert wine, such as a Vin Santo or a nice port, which complements the richness of the cake.
Creative Serving Ideas to Enhance the Dining Experience
– Layered Dessert Bowls: For a fun twist, serve the tiramisu in individual cups or jars, layering pieces of cake with frosting and coffee mixture for a deconstructed look.
– Chocolate Sauce Drizzle: Drizzle a rich chocolate sauce over each slice just before serving for an added layer of decadence.
Conclusion
The Heavenly Tiramisu Layer Cake is not just a dessert; it’s an experience that captures the essence of indulgence and celebration. With its rich layers of coffee-soaked cake and creamy mascarpone frosting, it’s a delightful treat that is sure to impress.
Making this cake can become a cherished tradition, bringing family and friends together around the table. As you experiment with different flavors and decorations, you’ll find ways to make this recipe uniquely yours. Enjoy the process of creating and sharing this heavenly dessert, and let it inspire sweet moments in your kitchen.