
Introduction: The Joy of No-Bake S’mores Fudge Bars
S’mores are more than just a treat; they are a timeless symbol of cherished moments spent around a crackling campfire, surrounded by friends and family. The combination of gooey marshmallows, rich chocolate, and crunchy graham crackers creates an unforgettable flavor profile that transports us back to carefree summer nights. But what if you could enjoy that mouthwatering experience without the need for a campfire? Introducing Sweet Campfire Delights: No-Bake S’mores Fudge Bars, a delightful dessert that encapsulates the essence of s’mores while offering a convenient, hassle-free approach.
These fudge bars blend the classic ingredients of s’mores—graham crackers, chocolate, and marshmallows—into a luscious, creamy fudge that requires no baking. This makes them a perfect solution for dessert lovers and busy individuals alike, allowing you to whip up a delicious treat without the time and effort typically associated with baking. Whether you’re planning a summer picnic, a holiday gathering, or simply craving a sweet snack, these no-bake s’mores fudge bars are sure to impress.
In this article, we will take you on a culinary journey through the delightful world of no-bake s’mores fudge bars. We will explore the key ingredients that make this treat so special, guide you through the step-by-step preparation, and share tips to elevate your dessert game. Get ready to indulge in a dessert that captures the spirit of s’mores while being incredibly easy to make.
Understanding the Ingredients: What Makes These Fudge Bars Special
To fully appreciate the magic of no-bake s’mores fudge bars, it’s essential to understand the role of each ingredient. Each component contributes to the overall flavor, texture, and experience of this decadent treat.
– Graham Cracker Crumbs: These are the foundational element of the fudge bars, providing the signature s’mores flavor and a crunchy texture that mimics the traditional graham cracker crust. They also help to bind the mixture together, making them an indispensable part of this recipe.
– Unsweetened Cocoa Powder: The addition of cocoa powder enhances the chocolate flavor of the fudge, imparting richness and depth. This ingredient is essential for creating a fudgy dessert that satisfies even the most ardent chocolate lovers.
– Granulated Sugar: Sugar balances the bitterness of the cocoa and contributes to the overall sweetness of the fudge bars. It is crucial for achieving that perfect dessert-like flavor.
– Unsalted Butter: This ingredient serves as a binding agent, helping to hold the mixture together while adding a creamy texture. The richness of the butter complements the other flavors beautifully.
– Sweetened Condensed Milk: Acting as the ‘glue’ for the ingredients, sweetened condensed milk is what gives these fudge bars their smooth, fudgy consistency. It also adds an extra layer of sweetness that enhances the overall taste.
– Mini Marshmallows: To capture the essence of s’mores, mini marshmallows introduce that signature marshmallow flavor and chewy texture. They provide little pockets of sweetness that elevate each bite.
– Chocolate Chips: Bursting with chocolatey goodness, chocolate chips add an indulgent touch to the fudge bars. You can choose between milk or dark chocolate, allowing for customization based on your preferences.
– Crushed Graham Crackers and Additional Marshmallows for Topping: Not only do these toppings enhance the presentation of the fudge bars, but they also add an extra crunch and a pop of marshmallow flavor, making each bar visually appealing and delicious.
Step-by-Step Preparation: Crafting Your No-Bake S’mores Fudge Bars
Before diving into the preparation of your no-bake s’mores fudge bars, it’s important to set up your workspace and gather the necessary tools. A clean and organized kitchen will not only ensure optimal food safety but also make the process more enjoyable.
Preparing Your Workspace and Tools
– Importance of Cleanliness: A clean workspace is crucial for food safety, preventing cross-contamination and ensuring that your ingredients remain uncontaminated. Take a moment to wipe down your counters and gather your ingredients.
– Essential Tools: To successfully create your fudge bars, you will need the following kitchen tools:
– Mixing bowls: For combining your ingredients.
– Spatula: A sturdy spatula or wooden spoon for mixing.
– Measuring cups and spoons: To accurately measure your ingredients.
– An 8×8 inch baking dish: This will be the mold for your fudge bars.
Creating the Fudge Base
The first step in crafting your no-bake s’mores fudge bars is to prepare the fudge base, which involves mixing your dry ingredients and creating a smooth, cohesive mixture.
– Mixing Dry Ingredients: Start by combining the graham cracker crumbs, cocoa powder, and granulated sugar in a mixing bowl. To achieve a clump-free mixture, use a whisk to thoroughly combine these dry ingredients. This will ensure that the cocoa powder is evenly distributed throughout the mixture, preventing any bitter pockets in your final product.
Next, melt the unsalted butter in a separate bowl, either in the microwave or on the stove. Once melted, combine it with the sweetened condensed milk, stirring until the mixture is smooth and well-blended. Gradually add this wet mixture to your dry ingredients, stirring until everything is fully incorporated. You should have a thick, fudgy base that is ready for the addition of chocolate chips and marshmallows.
As you prepare your no-bake s’mores fudge bars, remember to savor the process. The enticing aroma of chocolate and graham crackers will soon fill your kitchen, setting the stage for a delightful treat that brings back memories of summer evenings spent around the fire. In the following sections of this article, we will guide you through the final steps of assembling and enjoying your Sweet Campfire Delights. Stay tuned for more delicious insights and tips!
{{image_2}}
Incorporating Wet Ingredients
To create the perfect no-bake s’mores fudge bars, the process of combining your wet ingredients is crucial. Begin by measuring your ingredients accurately, including sweetened condensed milk, melted butter, and any flavoring extracts you choose to include, such as vanilla or chocolate.
Techniques for Achieving a Homogenous Batter
When mixing your wet ingredients, it’s essential to use a large bowl and a whisk or an electric mixer on low speed. Start by combining the melted butter with the sweetened condensed milk, ensuring they are fully integrated before adding any dry ingredients. The goal is to achieve a smooth and creamy consistency without lumps. This thorough mixing is vital, as it ensures that the fudge bars have a uniform flavor and texture.
Adding Flavorful Elements
Once your wet ingredients are prepared, it’s time to incorporate the dry ingredients and any additional flavor elements.
Folding in Marshmallows and Chocolate
After the wet mixture is ready, gently fold in mini marshmallows and chocolate chips into the batter. Use a spatula to lift and turn the mixture rather than stirring vigorously, which can break the marshmallows and chocolate chips. This gentle mixing preserves the integrity of the marshmallows, giving your fudge bars that delightful gooey texture that mimics traditional s’mores.
Achieving the Perfect Consistency
To determine if your mixture is ready for the baking dish, look for a thick, dough-like consistency that holds its shape yet is still pliable. It should not be runny, and when you scoop it with a spatula, it should hold together without falling apart. This is the perfect stage to transfer your fudge mixture into the prepared baking dish.
Final Touches and Setting
Spreading the Mixture
Once your mixture is ready, it’s time to spread it evenly in your baking dish. Use a spatula or the back of a spoon to smooth the top. Start from the center and push the mixture toward the edges, applying even pressure to ensure that the fudge layer is uniform throughout. This step is crucial as it affects the overall texture and appearance of your fudge bars.
Topping Techniques
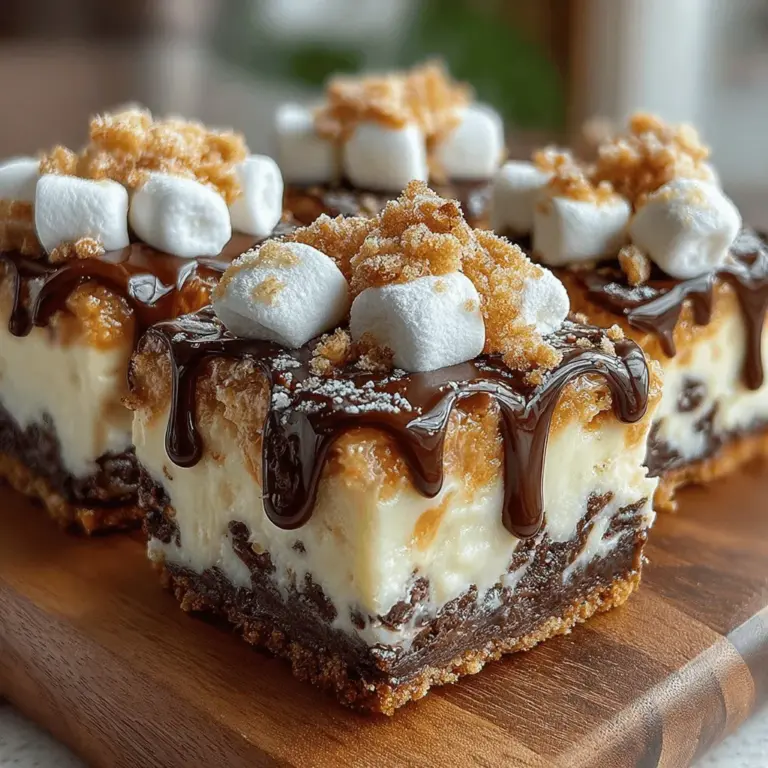
For the final touches, sprinkle crushed graham crackers and additional mini marshmallows on top of your fudge mixture. To secure the toppings, gently press them into the fudge using the flat side of your spatula or your hands. This ensures that they adhere well and won’t fall off when you cut the bars later.
Chilling and Serving Your Fudge Bars
Importance of Chilling
Now that your fudge bars are assembled, the chilling process is key to achieving the right texture and flavor development. Place the baking dish in the refrigerator for at least 2-3 hours, or until the fudge is firm to the touch. Chilling allows the fudge to set properly, giving it that creamy yet solid texture that’s so satisfying. It also enhances the flavor as the ingredients meld together during this time.
Presentation Tips
When your fudge bars have set, remove them from the refrigerator and let them sit at room temperature for about 10-15 minutes before cutting. This helps soften them slightly, making them easier to slice. Use a sharp knife to cut them into bars or squares, wiping the knife between cuts for clean edges. For an extra touch, consider garnishing your fudge bars with a drizzle of melted chocolate or a sprinkle of extra crushed graham crackers for visual appeal.
The Experience of Enjoying No-Bake S’mores Fudge Bars
Flavor Profile and Texture
As you take your first bite of these no-bake s’mores fudge bars, you’ll be greeted with a delightful explosion of flavors and textures. The creamy fudge melts in your mouth, while the crunchy topping adds a satisfying contrast. The gooey mini marshmallows provide that classic s’mores experience, making every bite a nostalgic journey back to summer campfires. The balance of sweetness from the chocolate and the slight saltiness from the graham cracker crust rounds out the flavor profile beautifully.
Perfect Pairings
To elevate your fudge bar experience, consider pairing them with a glass of cold milk, a rich hot chocolate, or even a scoop of vanilla ice cream. These drinks complement the sweetness of the fudge while adding another layer of indulgence. For an adult twist, pair with a robust coffee or a dessert wine, which can enhance the chocolate notes in the fudge.
Occasions to Serve Your Fudge Bars
Seasonal Celebrations
These no-bake fudge bars are incredibly versatile and can be enjoyed year-round. They are perfect for summer gatherings, backyard barbecues, or picnics, where their no-bake nature keeps the kitchen cool. During holidays, they can be a festive addition to dessert tables, and their s’mores flavor makes them a crowd favorite at bonfires or movie nights.
Kid-Friendly Fun
Not only are these fudge bars delicious, but they also make for a fun cooking project with kids. The simplicity of the recipe allows children to participate in the preparation process, from mixing to topping. This makes it a wonderful family activity, fostering creativity and teamwork while creating a delicious treat that everyone can enjoy.
Conclusion: The Allure of No-Bake S’mores Fudge Bars
In a world that often demands complex recipes and elaborate desserts, the Sweet Campfire Delights: No-Bake S’mores Fudge Bars stand out as a simple yet indulgent treat. Their ease of preparation, combined with the nostalgic flavors of s’mores, makes them a go-to recipe for any occasion. Whether enjoyed at a summer barbecue or as a cozy dessert on a chilly evening, these fudge bars are sure to bring joy and satisfaction to anyone who tastes them. Embracing the spirit of s’mores without the hassle of a campfire, this recipe invites you to enjoy the sweet moments life has to offer. Try them today and create your own sweet memories!
